Imagine a breakfast where perfectly poached eggs, with their luscious, runny yolks and tender whites, appear almost effortlessly. For many, achieving this culinary dream often feels confined to fancy brunch spots or stovetop wizardry. But what if you could master the art of poaching right in your microwave, turning out flawless results in minutes? This comprehensive guide will transform your morning routine, revealing the secrets to microwave poached eggs that are not only quick and easy but also consistently perfect, every single time. We’ll navigate common pitfalls like uneven cooking and the dreaded egg explosion, ensuring your journey to breakfast bliss is smooth and successful.
What is Microwave Poaching?
|
Our Picks for the Best Microwave oven in 2026
As an Amazon Associate I earn from qualifying purchases.
|
||
| Num | Product | Action |
|---|---|---|
| 1 | GASLAND 30 Inch Over-the-Range Microwave Oven, 1.7 Cu.Ft Over Stove Microwave, 1000W with 10 Power Levels, Sensor & One-Touch Cooking, 300 CFM Venting, LED Cooktop Light, Black Kitchen Microwave |

|
| 2 | TOSHIBA EM131A5C-SS Countertop Microwave Ovens 1.2 Cu Ft with 12.4" Removable Turntable Smart Humidity Sensor, 12 Auto Menus Mute Function ECO Mode Easy Clean Interior, 1000W, Silver |
|
| 3 | Chefman Countertop Microwave Oven 0.7 Cu. Ft., 700 Watts with 10 Power Levels, 6 Cooking Presets with One-Touch Express Cook, Eco Mode, Child Safety Lock, & Mute Button - Black |
|
| 4 | COMFEE CMO-C20M1WH Retro Microwave with 11 power levels, Fast Multi-stage Cooking, Turntable Reset Function Kitchen Timer, Speedy Cooking, Weight/Time Defrost, Memory function, Children Lock, 700W |
|
| 5 | BLACK+DECKER EM720CB7 Digital Microwave Oven with Turntable Push-Button Door, Child Safety Lock, 700W, Stainless Steel, 0.7 Cu.ft |
|
| 6 | COMFEE' Retro Small Microwave Oven With Compact Size, 9 Preset Menus, Position-Memory Turntable, Mute Function, Countertop Microwave For Small Spaces, 0.7 Cu Ft/700W, Green, AM720C2RA-G |
|
| 7 | COMFEE' Retro Small Microwave Oven With Compact Size, 9 Preset Menus, Position-Memory Turntable, Mute Function, Countertop, Perfect For Small Spaces, 0.7 Cu Ft/700W, Red, AM720C2RA-R |
|
| 8 | COMFEE' Retro Small Microwave Oven With Compact Size, 9 Preset Menus, Position-Memory Turntable, Mute Function, Countertop Perfect For Spaces, 0.7 Cu Ft/700W, Cream, AM720C2RA-A |
|
| 9 | COMFEE' EM720CPL-PMB Countertop Microwave Oven with Sound On/Off, ECO Mode and Easy One-Touch Buttons, 0.7cu.ft, 700W, Black |
|
| 10 | TOSHIBA EM131A5C-BS Countertop Microwave Ovens 1.2 Cu Ft, 12.4" Removable Turntable Smart Humidity Sensor 12 Auto Menus Mute Function ECO Mode Easy Clean Interior Black Color 1000W |
|
At its heart, poaching involves cooking an egg without its shell in hot, but not vigorously boiling, water. This gentle cooking method yields a delicate texture, with a firm white cradling a wonderfully soft, flowing yolk. Microwave poaching offers a rapid alternative to the traditional stovetop method. It leverages the microwave’s ability to quickly heat water, creating steam and a hot environment that cooks the egg. The efficiency of a microwave means you can enjoy a beautifully poached egg with minimal fuss and cleanup, making it an ideal choice for busy mornings or a quick, healthy snack.
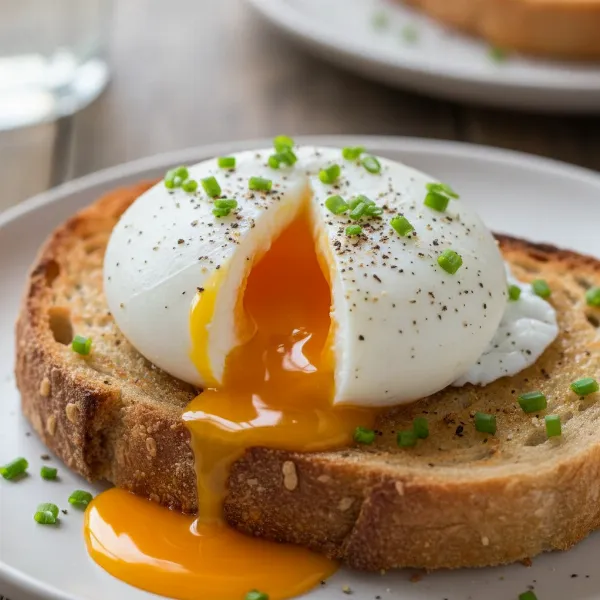 A close-up of a perfectly microwave-poached egg with a runny yolk on toast.
Understanding Your Microwave for Egg Poaching
Not all microwaves are created equal, and understanding yours is key to achieving perfect poached eggs. Microwave wattage, which typically ranges from 600 to 1200 watts in home models, directly impacts cooking time. A higher wattage microwave will cook faster than a lower wattage one. This variability means that what works in one microwave might require adjustment in another. Embracing a bit of trial and error is essential. Start with a recommended time, observe the results, and then tweak as needed. Some chefs also suggest using lower power settings, such as 50% or 70%, for a slightly longer duration, which can lead to more even cooking and reduce the risk of overcooking or dreaded egg explosions.
The Essential Equipment
Before you begin your microwave poaching adventure, gather a few basic items. You’ll need a microwave-safe mug or a small, heat-proof bowl, preferably one that holds about 1 to 1.5 cups. Its size will influence the shape of your poached egg; wider bowls tend to produce flatter eggs, while taller mugs yield a more traditional round shape. Crucially, you’ll also need a small, microwave-safe plate or a piece of microwave-safe plastic wrap to act as a cover. A toothpick or a sharp knife is indispensable for a critical safety step, and a slotted spoon will be your best friend for gently retrieving your perfectly cooked egg.
 Essential equipment for microwave egg poaching: mug, plate, toothpick, and slotted spoon.
Step-by-Step Guide to Perfect Microwave Poached Eggs
Ready to create your culinary masterpiece? Follow these steps for consistently delightful microwave poached eggs.
Step 1: Prepare Your Water
Start by pouring about 1/2 cup of cold tap water into your chosen microwave-safe mug or bowl. To enhance both flavor and texture, consider adding a tiny pinch of salt to the water; this can also help slow down the heating process for more even cooking. For an extra touch of perfection, a teaspoon of white vinegar or apple cider vinegar can be stirred in. The acidity helps the egg whites coagulate faster, preventing those wispy, feathery strands and ensuring a tidier, more compact poached egg.
Step 2: Crack the Egg
Gently crack a fresh egg directly into the water, being careful not to break the yolk. The water should completely submerge the egg. Fresh eggs are highly recommended here, as their whites are thicker and will hold their shape better during cooking, contributing to a more aesthetically pleasing and perfectly cooked result.
Step 3: Crucial Safety Step – Pierce the Yolk
This step is non-negotiable for safety. Use a toothpick or the tip of a sharp knife to gently poke a small hole in the egg yolk. Be cautious not to rupture the yolk entirely; you just need to create a tiny vent. The purpose of this is to release pressure that can build up inside the yolk during microwaving, which is the primary cause of eggs exploding. This simple action prevents a potential mess and ensures a safer cooking experience.
Step 4: Cover and Microwave
Cover your mug or bowl tightly with a microwave-safe plate or plastic wrap. This cover serves a dual purpose: it traps steam, which helps cook the egg evenly, and it contains any splatter should an unforeseen incident occur. Microwave your egg on HIGH power for 30 seconds to 1 minute. Initial cooking times are always a starting point, as microwaves vary. Some experts even recommend starting with a medium power setting (around 50-70%) for 1 minute to 90 seconds for a more gentle and uniform cook.
Step 5: Check and Adjust
After the initial cooking time, carefully remove the cover, directing any steam away from your face to avoid burns. Check the egg’s doneness. The egg white should be mostly set and opaque, while the yolk should still appear soft and slightly jiggly beneath the surface if you prefer a runny center. If the egg white still looks too transparent or the yolk isn’t warm enough, re-cover the bowl and microwave in additional short bursts of 10 to 15 seconds. It’s always better to undercook slightly and add more time than to overcook.
Step 6: Rest and Serve
Once your egg reaches your desired level of doneness, let it rest in the hot water for another 30 seconds to 1 minute, with the cover still on. This resting period allows for carry-over cooking, ensuring the whites fully set while the yolk maintains its beautiful runny texture. Using a slotted spoon, carefully lift the poached egg from the water, allowing any excess liquid to drain. Gently place it on a paper towel or a slice of toast for a moment to absorb any remaining water before transferring it to your plate. Season with salt, pepper, or your favorite herbs, and enjoy!
Troubleshooting Common Microwave Poaching Issues
Even with the best instructions, challenges can arise. Here’s how to tackle them:
- Exploding Eggs: As emphasized, piercing the yolk is your primary defense. Also, ensuring the egg is fully submerged in water and using a cover helps. If explosions persist, try reducing your microwave’s power level and increasing the cooking time slightly, or pre-heat the water first before adding the egg.
- Unevenly Cooked Whites/Hard Yolk: This is often a sign of too much power or too long a cooking time. Reduce the power setting, shorten the initial cooking interval, or microwave the water first until steaming, then add the egg. Using fresher eggs with thicker whites can also improve consistency.
- Egg Sticking to the Bowl: A light coating of cooking spray or a dab of butter inside the mug or bowl before adding water can prevent sticking.
- Feathery Whites: If your egg whites are spreading out into wisps, ensure you’re using fresh eggs, as older eggs have thinner whites. Adding a teaspoon of vinegar to the water will also significantly help the whites coagulate and stay together.
Tips for Next-Level Microwave Poaching
Ready to elevate your microwave poaching game? These insider tips will help:
- Embrace Freshness: Always opt for the freshest eggs you can find. Fresh eggs have robust, compact whites that hold their shape beautifully, resulting in a neater and more appealing poached egg.
- Pre-heat Your Water: Microwaving the water until it’s steaming or just simmering before adding the egg can lead to more consistent results. This mimics traditional stovetop poaching more closely and reduces the risk of rubbery whites or overcooked yolks. Heat in short bursts (e.g., 30-60 seconds) to avoid superheating.
- Flavor Infusion: Don’t just stick to plain water. Experiment with adding a dash of hot sauce, a sprinkle of herbs, or even a splash of lemon juice to the poaching water for subtle flavor enhancements.
- One at a Time: For optimal control and consistent perfection, poach one egg at a time. While it might seem slower, it ensures each egg receives the precise attention it needs, preventing uneven cooking that can occur when microwaving multiple eggs.
- The Power of Resting: Never skip the resting phase. Allowing the egg to sit in the hot water for a minute after microwaving continues the cooking process gently, finalizing the whites’ set while preserving that wonderfully runny yolk.
Safety First: Microwave Egg Poaching Dos and Don’ts
While convenient, microwave cooking requires adherence to safety measures, especially with eggs.
- DO:
- Always use microwave-safe dishes made of glass or ceramic.
- Gently pierce the yolk with a toothpick to prevent explosions.
- Cover the bowl with a microwave-safe plate or plastic wrap to contain steam and any potential mess.
- Exercise caution when removing the cover, as trapped steam can cause burns. Angle the lid away from your face.
- Ensure the egg is fully submerged in water to cook evenly and safely.
- DON’T:
- Never microwave an egg in its shell, as the rapid buildup of steam will cause it to explode.
- Do not ignore the need to cover the egg, as this is a key safety measure.
- Avoid overcooking, as this increases the risk of explosions and results in a rubbery egg.
- Do not use metal bowls or utensils in the microwave.
- Be aware of “superheating” where water can become hotter than its boiling point without bubbling, only to erupt violently when disturbed. Heat water in short intervals to prevent this.
Cleaning Up After Your Microwave Poached Egg
One of the great joys of microwave poaching is the minimal cleanup. Immediately after use, rinse your mug or bowl with hot, soapy water. If any egg residue has dried, a quick soak for a few minutes will loosen it, making scrubbing a breeze. For stubborn bits, a non-abrasive sponge or a soft brush will do the trick. A clean microwave-safe dish means you’re always ready for your next perfectly poached egg.
Conclusion: Your Go-To for Quick, Perfect Poached Eggs
Mastering the art of poaching an egg in the microwave is a culinary game-changer, offering a fast, simple, and consistently delicious way to enjoy this breakfast classic. By understanding your microwave, following a few key steps, and prioritizing safety, you can effortlessly achieve eggs with beautifully set whites and luxuriously runny yolks, ready to elevate any meal. Embrace the convenience and savor the results. With a little practice, your microwave will become your secret weapon for quick and perfect poached eggs.
What will be your first culinary creation to feature your perfectly microwave-poached egg?
Frequently Asked Questions
Why do eggs explode in the microwave?
Eggs can explode in the microwave primarily due to pressure buildup inside the yolk. When microwaved, water molecules within the yolk heat rapidly and turn into steam. If this steam cannot escape, the internal pressure increases until the yolk ruptures violently, causing an explosion. Piercing the yolk gently with a toothpick creates a vent, allowing the steam to escape safely and preventing this issue.
Can I poach more than one egg at a time in the microwave?
While it’s technically possible, it’s generally recommended to poach one egg at a time for the most consistent and perfect results. Microwaves can heat unevenly, and cooking multiple eggs simultaneously can lead to some being undercooked and others overcooked. If you need several, cook them individually in succession.
How do I know if my egg is perfectly poached?
A perfectly poached egg will have whites that are fully set and opaque, but still tender and delicate. The yolk, however, should remain soft and runny, flowing freely when pierced. After microwaving, a quick check by gently nudging the egg can tell you if the whites are firm enough and the yolk still has its desired liquid consistency.
Is it safe to eat microwave poached eggs?
Yes, microwave poached eggs are safe to eat, provided you follow proper cooking and safety guidelines. Microwaving effectively cooks the egg, eliminating harmful bacteria. The primary safety concern is preventing explosions, which is managed by piercing the yolk and covering the dish. In terms of nutrition, they are a healthy option as they require no added fats.
Can I use cold water to poach an egg in the microwave?
You can use cold water, but many recipes recommend starting with hot or pre-heated water (microwaved for 30-60 seconds until steaming) for more even cooking and to reduce the total cooking time of the egg. Starting with hot water can help the whites set more quickly, preventing a rubbery texture and ensuring a perfectly runny yolk.
What’s the best type of bowl or mug to use for microwave poaching?
The best vessel is a microwave-safe ceramic mug or a small glass bowl that holds about 1 to 1.5 cups of liquid. Ensure it’s deep enough for the egg to be fully submerged in water. The shape can influence the final egg shape; wider bowls create flatter eggs, while taller mugs yield rounder ones. Always use a small plate or plastic wrap to cover it.