Microwave ovens are indispensable kitchen appliances, offering quick and convenient meal preparation. At the heart of their heating mechanism lies a crucial, yet potentially dangerous, component: the high-voltage capacitor. This device stores an immense electrical charge, vital for generating the microwaves that cook your food. However, like any electrical component, capacitors can fail, leading to a host of problems and even posing a significant safety risk if mishandled. Understanding how to safely identify and test a faulty microwave capacitor is key to troubleshooting your appliance and ensuring your safety. This guide will walk you through the symptoms of a bad capacitor, essential safety precautions, and detailed testing methods using a multimeter.
The Vital Role of Your Microwave Oven’s Capacitor
The high-voltage capacitor in your microwave oven is a critical part of the appliance’s power delivery system. Its primary function is to work in conjunction with a high-voltage transformer and a diode to create a “voltage doubler” circuit. This circuit is designed to take the standard household voltage and boost it to an extremely high level, often between 2,000 to 5,000 volts. This tremendous electrical energy is then supplied to the magnetron, the component responsible for generating the microwave radiation that heats your food.
Without a properly functioning capacitor, the magnetron cannot receive the necessary power to operate effectively, or at all. The capacitor essentially acts as a powerful temporary battery, accumulating a substantial charge and then releasing it to facilitate the cooking process.
Why Microwave Capacitors Are Dangerous
|
Our Picks for the Best Microwave oven in 2026
As an Amazon Associate I earn from qualifying purchases.
|
||
| Num | Product | Action |
|---|---|---|
| 1 | TOSHIBA EM131A5C-BS Countertop Microwave Ovens 1.2 Cu Ft, 12.4" Removable Turntable Smart Humidity Sensor 12 Auto Menus Mute Function ECO Mode Easy Clean Interior Black Color 1000W |

|
| 2 | BLACK+DECKER EM720CB7 Digital Microwave Oven with Turntable Push-Button Door, Child Safety Lock, 700W, Stainless Steel, 0.7 Cu.ft |
|
| 3 | COMFEE' Retro Small Microwave Oven With Compact Size, 9 Preset Menus, Position-Memory Turntable, Mute Function, Countertop Perfect For Spaces, 0.7 Cu Ft/700W, Cream, AM720C2RA-A |
|
| 4 | COMFEE' Retro Small Microwave Oven With Compact Size, 9 Preset Menus, Position-Memory Turntable, Mute Function, Countertop Microwave For Small Spaces, 0.7 Cu Ft/700W, Green, AM720C2RA-G |
|
| 5 | COMFEE' EM720CPL-PMB Countertop Microwave Oven with Sound On/Off, ECO Mode and Easy One-Touch Buttons, 0.7cu.ft, 700W, Black |
|
| 6 | COMFEE' Retro Small Microwave Oven With Compact Size, 9 Preset Menus, Position-Memory Turntable, Mute Function, Countertop, Perfect For Small Spaces, 0.7 Cu Ft/700W, Red, AM720C2RA-R |
|
| 7 | TOSHIBA EM131A5C-SS Countertop Microwave Ovens 1.2 Cu Ft with 12.4" Removable Turntable Smart Humidity Sensor, 12 Auto Menus Mute Function ECO Mode Easy Clean Interior, 1000W, Silver |
|
| 8 | COMFEE CMO-C20M1WH Retro Microwave with 11 power levels, Fast Multi-stage Cooking, Turntable Reset Function Kitchen Timer, Speedy Cooking, Weight/Time Defrost, Memory function, Children Lock, 700W |
|
| 9 | Chefman Countertop Microwave Oven 0.7 Cu. Ft., 700 Watts with 10 Power Levels, 6 Cooking Presets with One-Touch Express Cook, Eco Mode, Child Safety Lock, & Mute Button - Black |
|
| 10 | GASLAND 30 Inch Over-the-Range Microwave Oven, 1.7 Cu.Ft Over Stove Microwave, 1000W with 10 Power Levels, Sensor & One-Touch Cooking, 300 CFM Venting, LED Cooktop Light, Black Kitchen Microwave |
|
It’s crucial to understand that microwave capacitors can retain a lethal electrical charge long after the appliance has been unplugged from the wall outlet. Unlike other household electronics where power dissipates almost immediately, the design of a microwave capacitor allows it to store this high voltage for extended periods. Direct contact with a charged capacitor can result in a severe, potentially fatal, electrical shock. This inherent danger necessitates extreme caution and adherence to strict safety protocols whenever you’re working inside a microwave oven, especially when handling its capacitor.
Warning Signs: Is Your Microwave Capacitor Failing?
Identifying the symptoms of a failing microwave capacitor is the first step in diagnosing your appliance’s issues. While some problems might be subtle, others are quite pronounced.
Here are the common indicators that your microwave oven’s capacitor might be going bad:
- Microwave Runs But Doesn’t Heat Food: This is perhaps the most common symptom. The lights come on, the turntable spins, and the timer counts down, but your food remains cold. The capacitor isn’t delivering enough power to the magnetron.
- Unusual Noises: You might hear strange buzzing, humming, or crackling sounds coming from the microwave, particularly when it’s operating. These noises often signal electrical instability within the high-voltage circuit.
- Burnt Smell or Signs of Overheating: A distinct burning odor emanating from your microwave, along with visible scorch marks or melted components near the capacitor or transformer, indicates a serious electrical fault.
- Microwave Shuts Down After a Few Seconds: If your microwave starts but quickly stops working, it could be due to an overburdened or failing capacitor that can’t sustain the power delivery.
- Tripping the Circuit Breaker or Blowing Fuses: A shorted or failing capacitor can draw excessive current, causing your home’s circuit breaker to trip or the microwave’s internal fuse to blow repeatedly. This is a clear sign of an electrical fault requiring immediate attention.
- Visible Damage to the Capacitor: Before even testing with a multimeter, perform a visual inspection. Look for a capacitor that appears bulged, swollen, leaking fluid, or shows any signs of burning or discoloration. Any of these visual cues typically mean the capacitor has failed and needs immediate replacement.
If you observe any of these symptoms, it’s time to investigate the capacitor, but always remember to prioritize safety above all else.
Safety First: Non-Negotiable Precautions Before You Begin
Working with a microwave oven’s high-voltage components, especially the capacitor, requires extreme caution. Ignoring safety precautions can lead to serious injury or even death. Always follow these essential steps before attempting any diagnostic or repair work:
- Unplug the Microwave: This is the most critical first step. Ensure the microwave oven is completely disconnected from its power source by removing the plug from the wall outlet. Do not simply turn off the appliance; physically unplug it.
- Wait Several Minutes: Even after unplugging, the capacitor can hold a dangerous residual charge. Wait at least five to ten minutes after unplugging to allow some of this charge to dissipate naturally. However, never assume it’s fully discharged.
- Wear Personal Protective Equipment (PPE):
- Insulated Gloves: Use heavy-duty, electrically insulated rubber gloves to protect your hands from accidental contact with live components.
- Safety Goggles: Protect your eyes from potential sparks that can occur during discharge.
- Use Insulated Tools: Only use tools with insulated handles, such as screwdrivers. This provides an additional layer of protection against electrical shock.
- Work in a Safe Environment: Ensure your workspace is dry, well-lit, and free of clutter. Avoid standing on wet surfaces.
- The “One-Hand Rule”: Whenever you’re working inside the microwave’s chassis, try to keep one hand in your pocket. This prevents electricity from forming a complete circuit through your body if you accidentally touch a live component.
- Never Touch Terminals Directly: Avoid direct contact with the capacitor terminals with bare hands or uninsulated tools.
These precautions are not optional; they are essential for your safety.
Tools You’ll Need for Capacitor Diagnosis
To safely and effectively test your microwave oven’s capacitor, you’ll need a few specific tools:
- Multimeter: A digital multimeter is essential. Ideally, it should have a capacitance (Farad) setting, as this provides the most accurate test. If not, a multimeter with an ohms (resistance) setting can still provide a basic diagnostic.
- Insulated Screwdriver: A long screwdriver with a thick, rubberized handle is crucial for safely discharging the capacitor.
- Safety Gloves and Goggles: As mentioned, these are non-negotiable for personal protection.
- Needle-Nose Pliers (optional): These can be helpful for manipulating wires or reaching tight spots, but ensure they also have insulated handles.
- Camera (optional): Taking photos of wire connections before disconnecting them can be invaluable for reassembly.
Step-by-Step: Safely Discharging the Microwave Capacitor
Before you can even begin testing, you must safely discharge the capacitor. This step neutralizes the stored high-voltage charge and eliminates the risk of electric shock.
- Unplug and Wait: Ensure the microwave is unplugged from the wall outlet and allow it to sit for at least 5-10 minutes.
- Access the Capacitor: Carefully remove the outer casing of your microwave. You’ll usually find the capacitor located near the high-voltage transformer, often looking like a large metal cylinder with two or more terminals.
- Identify Terminals: The capacitor will have two primary terminals where wires connect. In some cases, there might be additional terminals or a metal casing.
- Discharge the Capacitor:
- Wearing your insulated gloves and safety goggles, take your insulated screwdriver.
- Place the metal blade of the screwdriver across the two main terminals of the capacitor, simultaneously touching both.
- You may hear a loud “POP” and see a spark as the stored energy discharges. This is normal. Hold the screwdriver in place for a few seconds to ensure a complete discharge.
- Repeat this process by touching one terminal and then the other to the metal chassis (ground) of the microwave oven. This ensures any remaining charge is safely dissipated.
- Verify Discharge (Optional but Recommended): If your multimeter has a DC voltage setting, you can use it to confirm the capacitor is fully discharged. Set the multimeter to a high DC voltage range (e.g., 1000V DC). Place the probes across the capacitor terminals. The reading should be close to zero volts. If there’s still a significant voltage, repeat the discharge process.
Only after confirming the capacitor is discharged is it safe to proceed with further handling or testing.
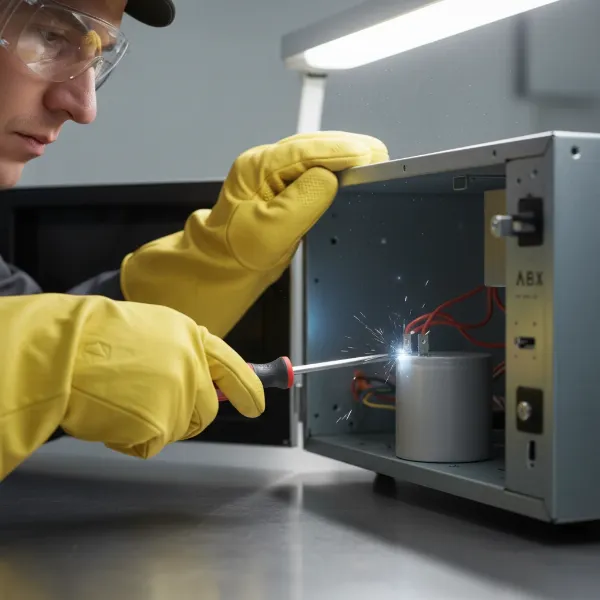 A person safely discharging a microwave capacitor with an insulated screwdriver, wearing gloves and goggles
Testing Your Capacitor with a Multimeter
Once the capacitor is safely discharged, you can test its functionality. There are two primary methods using a multimeter: a basic resistance check and a more accurate capacitance check.
Visual Inspection
Before touching your multimeter, give the capacitor a thorough visual inspection:
- Bulging or Swelling: A healthy capacitor should have flat ends. If either end looks bulged or swollen, it’s a sign of internal pressure and failure.
- Leaking Fluid: Look for any oily residue or electrolyte leakage around the terminals or body of the capacitor.
- Burn Marks or Discoloration: Any signs of scorching, blackening, or discoloration on the capacitor’s body or terminals indicate overheating and failure.
If you observe any of these visual defects, the capacitor is bad and should be replaced. No further electrical testing is necessary.
Method 1: Using Resistance Mode (Ohm Meter) – For Basic Check
This method can help detect if the capacitor is shorted or open, but it won’t give you its exact capacitance value.
- Set Your Multimeter: Turn your multimeter’s dial to the highest resistance (Ohms, Ω) setting. This is often labeled as 10K or similar.
- Connect Probes to Terminals: Place one multimeter probe on each of the capacitor’s terminals.
- Observe the Reading:
- Initially, the meter should show a low resistance reading (close to zero or a few hundred ohms) as the capacitor begins to charge from the multimeter’s internal battery.
- Then, the resistance should gradually rise and eventually drift towards infinity (often displayed as “OL” for Overload or Open Line). This “charging” behavior indicates the capacitor is likely functioning correctly in terms of holding a charge.
- Reverse the Probes: Remove the probes, then reverse their positions on the terminals. You should observe the same pattern: a momentary drop in resistance as it charges in the opposite direction, followed by a rise towards infinity.
- Interpreting Results (Resistance Mode):
- Good Capacitor: Shows a brief low resistance reading that then rises towards infinity, and repeats this behavior when probes are reversed.
- Shorted Capacitor (BAD): The meter immediately reads zero or very low resistance and stays there, even when probes are reversed. This means the capacitor is allowing current to pass freely, rather than storing it.
- Open Capacitor (BAD): The meter immediately reads infinity (OL) and stays there, showing no initial drop in resistance. This indicates an internal break, and the capacitor cannot store any charge.
Testing for Short to Ground
After testing across the terminals, you should also check for a short between the capacitor’s terminals and its metal casing (if applicable), which should be grounded.
- Place one multimeter probe on a capacitor terminal.
- Place the other probe on the bare metal casing of the capacitor.
- The multimeter should read infinity (OL). If it shows any continuity (a low resistance reading), the capacitor is shorted to ground and is faulty. Repeat for the other terminal.
Method 2: Using Capacitance Mode (Recommended) – For Accurate Value
If your multimeter has a capacitance (Farad, µF, nF, pF) setting, this is the most accurate way to test the capacitor’s actual value.
- Set Your Multimeter: Turn the dial to the capacitance setting. The symbol often looks like two parallel lines or two parentheses facing away from each other (–|(–). If there are different ranges (e.g., nF, µF), choose a range appropriate for microwave capacitors (typically around 1 microfarad, µF).
- Identify Capacitor Rating: Look for the capacitance value printed on the side of the capacitor. Microwave capacitors commonly range from 0.8 µF to 1.2 µF, usually with a tolerance (e.g., ±3%).
- Connect Probes to Terminals: Place one multimeter probe on each of the capacitor’s terminals.
- Observe the Reading: The multimeter will display the capacitance value.
- Interpreting Results (Capacitance Mode):
- Good Capacitor: The reading should be very close to the value printed on the capacitor, falling within its specified tolerance (e.g., for a 0.95 µF ±3% capacitor, the reading should be between 0.9215 µF and 0.9785 µF).
- Bad Capacitor:
- If the meter reads “0,” “OL” (Overload/Open Line), or a value significantly lower than the stated rating (outside the tolerance), the capacitor is bad.
- Some meters might show a constant low reading if it’s shorted, or no reading at all if it’s open.
 A digital multimeter displaying a capacitance reading while its probes are connected to a microwave capacitor
What Your Multimeter Readings Mean
Here’s a quick summary of what to look for when testing your microwave capacitor:
- Good Capacitor:
- Visual: No bulging, leaks, or burn marks.
- Resistance Test: Briefly shows low resistance, then rises to infinity (OL). Repeats when probes are reversed. No continuity to case.
- Capacitance Test: Reading is within the printed tolerance of the capacitor’s specified value.
- Bad Capacitor:
- Visual: Bulging, leaking, burn marks, or discoloration.
- Resistance Test:
- Shorted: Reads zero or consistently very low resistance.
- Open: Reads infinity (OL) immediately and constantly.
- Shorted to Ground: Shows continuity between a terminal and the metal casing.
- Capacitance Test: Reads “0”, “OL”, or a value significantly outside the specified tolerance.
If your capacitor tests as bad using either method, or if there’s any visible damage, it needs to be replaced.
When to Call a Professional Appliance Technician
While testing a microwave capacitor can be a rewarding DIY task, there are circumstances when calling a professional appliance technician is the safest and most sensible option:
- You’re Uncomfortable with High Voltage: If you are at any point uncomfortable working with high-voltage components or are unsure about any step, do not proceed. The risks are too high.
- Lack of Proper Tools: If you don’t have an appropriate multimeter, insulated tools, or safety gear, it’s best to call a professional.
- Complex Diagnosis: If your microwave has multiple issues or the capacitor tests fine but the microwave still isn’t working, the problem could lie with other high-voltage components like the magnetron or high-voltage diode, which require specialized knowledge to diagnose and replace.
- No Experience with Electrical Repairs: High-voltage electrical work is not a task for beginners. If you lack experience, a professional can ensure the repair is done correctly and safely.
- Warranty Concerns: Attempting DIY repairs might void your microwave’s warranty. Check your warranty terms before proceeding.
Remember, a professional technician has the expertise, training, and specialized equipment to handle these repairs safely and efficiently.
Conclusion: Diagnosing Your Microwave Capacitor Safely
A malfunctioning high-voltage capacitor is a common culprit behind a non-heating microwave oven. While it’s possible to test this component yourself, the inherent dangers of stored high voltage cannot be overstated. By understanding the critical role of the microwave capacitor, recognizing the common symptoms of its failure, and meticulously following all safety precautions – especially discharging the capacitor – you can safely diagnose the problem. Whether you choose to use your multimeter’s resistance or capacitance mode, accurate testing will reveal if your microwave oven capacitor is truly bad. If you’re ever in doubt or uncomfortable with any step, don’t hesitate to seek the assistance of a qualified appliance repair professional to ensure both your safety and the proper functioning of your appliance.
Have you ever successfully diagnosed a microwave issue on your own?
Frequently Asked Questions
Why is a microwave capacitor so dangerous even when unplugged?
Microwave capacitors are specifically designed to store a significant amount of electrical energy at extremely high voltages (up to 5,000 volts). Unlike many other electrical components, they can retain this charge for an extended period, even after the microwave has been unplugged from the wall. This residual charge can deliver a severe, potentially fatal, electric shock upon contact.
Can a bad capacitor damage other microwave parts?
Yes, a failing or shorted capacitor can potentially damage other components in the high-voltage circuit, such as the high-voltage transformer or the magnetron. A shorted capacitor, for instance, can cause excessive current draw, leading to overheating or blowing fuses, and can stress other parts of the circuit.
How often do microwave capacitors fail?
The lifespan of a microwave capacitor varies depending on usage, manufacturing quality, and environmental factors like heat. They are generally robust but can fail over time due to normal wear, electrical surges, or internal breakdown of dielectric material. It’s one of the more common components to fail in an older microwave.
Can I replace a microwave capacitor myself after testing it?
While testing is a diagnostic step, replacing a microwave capacitor is a more involved repair that also carries significant risks due to high voltage. If you are not experienced with high-voltage electronics repair, it is strongly recommended to have a qualified appliance technician perform the replacement to ensure safety and proper installation.
What is the typical lifespan of a microwave oven capacitor?
A typical microwave oven capacitor can last anywhere from 5 to 10 years, or even longer, depending on the quality of the component and how frequently the microwave is used. However, factors like power surges, continuous heavy use, or manufacturing defects can shorten its lifespan.