Has your microwave started sparking, making strange noises, or simply not heating food as efficiently as it once did? Often, the culprit is a small but crucial component called the mica sheet. This thin cover acts as a protective shield and an essential guide for microwave energy, and when it’s damaged, it compromises both your appliance’s performance and your safety. Fortunately, replacing it is a straightforward task you can tackle yourself with the right guidance. This article will walk you through everything you need to know, from understanding the mica sheet’s role to a detailed, step-by-step replacement process, ensuring your microwave is back to safe, optimal operation.
What is a Microwave Mica Sheet?
|
Our Picks for the Best Microwave oven in 2026
As an Amazon Associate I earn from qualifying purchases.
|
||
| Num | Product | Action |
|---|---|---|
| 1 | GASLAND 30 Inch Over-the-Range Microwave Oven, 1.7 Cu.Ft Over Stove Microwave, 1000W with 10 Power Levels, Sensor & One-Touch Cooking, 300 CFM Venting, LED Cooktop Light, Black Kitchen Microwave |

|
| 2 | COMFEE' Retro Small Microwave Oven With Compact Size, 9 Preset Menus, Position-Memory Turntable, Mute Function, Countertop Perfect For Spaces, 0.7 Cu Ft/700W, Cream, AM720C2RA-A |
|
| 3 | Chefman Countertop Microwave Oven 0.7 Cu. Ft., 700 Watts with 10 Power Levels, 6 Cooking Presets with One-Touch Express Cook, Eco Mode, Child Safety Lock, & Mute Button - Black |
|
| 4 | TOSHIBA EM131A5C-BS Countertop Microwave Ovens 1.2 Cu Ft, 12.4" Removable Turntable Smart Humidity Sensor 12 Auto Menus Mute Function ECO Mode Easy Clean Interior Black Color 1000W |
|
| 5 | COMFEE' EM720CPL-PMB Countertop Microwave Oven with Sound On/Off, ECO Mode and Easy One-Touch Buttons, 0.7cu.ft, 700W, Black |
|
| 6 | COMFEE CMO-C20M1WH Retro Microwave with 11 power levels, Fast Multi-stage Cooking, Turntable Reset Function Kitchen Timer, Speedy Cooking, Weight/Time Defrost, Memory function, Children Lock, 700W |
|
| 7 | COMFEE' Retro Small Microwave Oven With Compact Size, 9 Preset Menus, Position-Memory Turntable, Mute Function, Countertop Microwave For Small Spaces, 0.7 Cu Ft/700W, Green, AM720C2RA-G |
|
| 8 | BLACK+DECKER EM720CB7 Digital Microwave Oven with Turntable Push-Button Door, Child Safety Lock, 700W, Stainless Steel, 0.7 Cu.ft |
|
| 9 | TOSHIBA EM131A5C-SS Countertop Microwave Ovens 1.2 Cu Ft with 12.4" Removable Turntable Smart Humidity Sensor, 12 Auto Menus Mute Function ECO Mode Easy Clean Interior, 1000W, Silver |
|
| 10 | COMFEE' Retro Small Microwave Oven With Compact Size, 9 Preset Menus, Position-Memory Turntable, Mute Function, Countertop, Perfect For Small Spaces, 0.7 Cu Ft/700W, Red, AM720C2RA-R |
|
The mica sheet, often referred to as the waveguide cover, is a thin, usually rectangular piece of material found inside your Microwave Oven, typically on the right-hand wall or sometimes the ceiling. Its primary function is twofold: it protects the internal waveguide, which directs microwave energy from the magnetron to the cooking cavity, from food splatters and moisture. Secondly, it allows the microwave energy to pass through efficiently and safely, ensuring your food heats evenly without damaging delicate internal components. This protective barrier is crucial for the longevity and safe operation of your appliance.
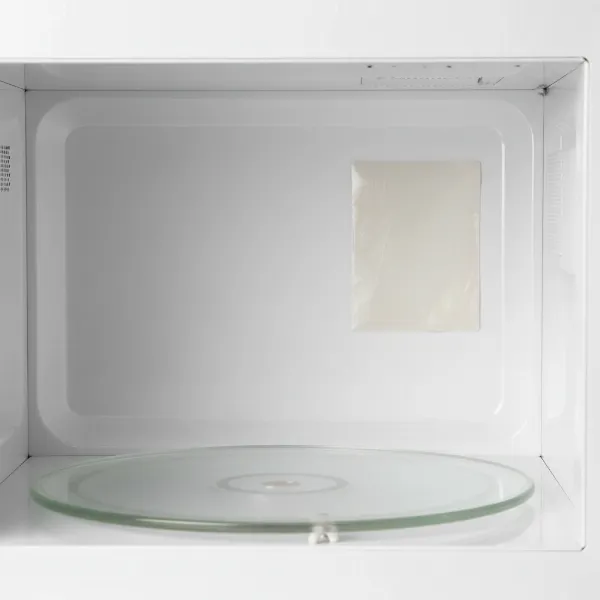 Close-up of a microwave's interior showing the rectangular mica sheet (waveguide cover).
Why Does Your Microwave’s Mica Sheet Need Replacing?
Over time, even the most diligent cooks will experience food splatters and moisture buildup inside their microwave. The mica sheet, being directly in the path of these culinary mishaps, can absorb grease and food particles. This absorption leads to discoloration, softening, and eventually, burning or cracking. Common signs that your mica sheet needs replacing include visible burn marks, dark spots, holes, or sparking inside the microwave cavity, especially when heating liquids or greasy foods. If left unaddressed, a damaged mica sheet can allow food and moisture to reach the waveguide and magnetron, leading to uneven heating, further damage to expensive internal components, and even a fire hazard. Prompt replacement is essential to prevent more serious issues.
Types of Mica Sheets and How to Get the Right One
When it comes to replacing your microwave’s mica sheet, you generally have two options: a pre-cut, model-specific sheet or a universal sheet that you cut to size. Pre-cut sheets are designed to perfectly fit your microwave’s make and model, offering the easiest installation. Universal mica sheets, typically sold in larger rectangles, provide a more cost-effective solution, especially if your specific model’s part is hard to find.
To ensure you get the correct replacement, whether pre-cut or universal, you’ll need your microwave’s model number. This is usually found on a sticker inside the microwave door, on the back of the appliance, or underneath. If opting for a universal sheet, carefully remove your old, damaged mica sheet and use it as a template to trace and cut the new one. Always use a sharp utility knife or scissors for clean edges and ensure the dimensions are exact for a snug fit.
Step-by-Step Guide to Safely Replacing Your Microwave’s Mica Sheet
Replacing your microwave’s mica sheet is a straightforward process, but safety should always be your top priority. Follow these steps carefully to ensure a secure and effective repair.
Safety First: Unplugging and Precautions
Before touching anything inside your microwave, always unplug it from the wall outlet. This is a critical safety step to prevent electric shock. Additionally, ensure your workspace is clean, dry, and well-lit. While a mica sheet replacement doesn’t typically expose high-voltage components, exercising caution is paramount.
Gathering Your Tools: Screwdriver, New Mica
For this repair, you’ll generally only need two main items:
- A Philips head or flathead screwdriver (depending on how your existing mica sheet is secured).
- Your new, correctly sized mica sheet. If you’re using a universal sheet, have a pair of sharp scissors or a utility knife on hand.
Removing the Old Mica Sheet: Screws, Clips, or Rivets
Open your microwave door and locate the mica sheet. It’s usually a light grey or brown rectangular panel.
- Examine how it’s secured: Some mica sheets are held in place by a single screw, others by plastic rivets that you can gently pry out, and some simply slide into slots or are held by small clips.
- Unscrew or unclip: If there’s a screw, use your screwdriver to remove it. If there are plastic rivets, carefully pry them out. For clipped or slotted sheets, gently bend the edges inward or slide them out of their grooves.
- Carefully remove: Once unsecured, gently pull out the old mica sheet. Be mindful not to scratch or damage the underlying waveguide.
Cleaning the Waveguide Area
With the old mica sheet removed, you’ll likely see a build-up of grime, burnt residue, or food particles in the area it covered. This is an opportune moment to clean thoroughly.
- Wipe down: Use a damp cloth with a mild, non-abrasive cleaner to wipe away any residue.
- Dry completely: Ensure the area is completely dry before proceeding. Any lingering moisture could cause future problems.
Installing the New Mica Sheet: Fit and Secure
Now it’s time to put the new mica sheet in place.
- Position the new sheet: Align the new mica sheet with the opening. If you cut a universal sheet, double-check that all edges are smooth and fit perfectly.
- Insert carefully: Slide the new sheet into the existing slots or clips. Some models might require you to slightly bend the sheet to snap it into place. Ensure it sits flat and snugly covers the waveguide.
- Secure it: Reinsert any screws or plastic rivets that were removed earlier. Tighten screws just enough to secure the sheet without over-tightening, which could crack the mica.
- Check alignment: Make sure the sheet is flush with the microwave’s interior wall and doesn’t have any gaps.
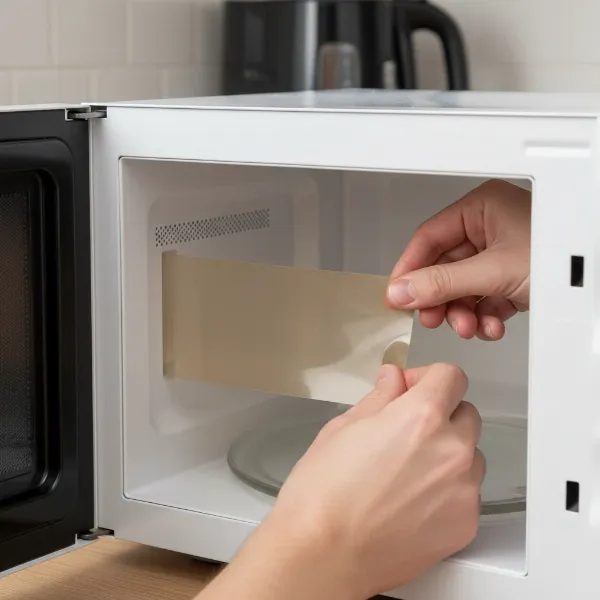 Hands carefully installing a new, clean mica sheet into a microwave oven's interior.
Final Checks and Testing
Once the new mica sheet is installed, perform a quick check:
- Door closure: Gently close and open the microwave door to ensure the new cover remains securely in place.
- Plug in: Plug your microwave back into the wall outlet.
- Test: Place a cup of water inside and run the microwave for 30 seconds to a minute. Listen for unusual noises and observe for any sparking. If the water heats up and there are no sparks, your repair was successful!
Maintaining Your Microwave’s Mica Sheet for Longevity
To extend the life of your new mica sheet and prevent future damage, regular maintenance is key. After each use, wipe down the interior of your microwave, especially around the mica sheet, to remove any food splatters or condensation. Use a damp cloth and mild soap, then wipe dry. Avoid using abrasive scrubbers or harsh chemicals that could damage the mica material. Promptly clean up spills to prevent them from drying and becoming difficult to remove, which could lead to excessive scraping and potential damage to the sheet.
Safety Precautions When Using a Microwave
Beyond maintaining the mica sheet, general microwave safety practices are crucial for the longevity of your appliance and the well-being of your household. Never operate your microwave with metal objects inside, as this can cause severe arcing and damage. Ensure adequate ventilation around your microwave, and avoid blocking air vents. If sparking or other unusual behavior reoccurs after replacing the mica sheet, unplug the unit immediately and consult a qualified technician. Do not attempt to repair other internal components yourself, as microwaves contain high-voltage capacitors that can store a dangerous electrical charge even when unplugged.
Conclusion: Keep Your Microwave Running Safely and Efficiently
Replacing the mica sheet in your microwave is a simple yet impactful DIY repair that can restore your appliance’s performance and ensure its safe operation. By understanding its vital role, recognizing signs of damage, and following our detailed step-by-step guide, you’ve gained the confidence to tackle this common issue. Remember, a well-maintained mica sheet is key to preventing sparks, promoting even heating, and extending the life of your microwave. Regular cleaning and adherence to safety guidelines will keep your kitchen essential running smoothly for years to come.
Are you ready to give your microwave the attention it deserves and enjoy worry-free cooking once again?
Frequently Asked Questions
Can I use aluminum foil to cover the hole if my microwave’s mica sheet is missing?
No, absolutely not. Using aluminum foil or any other metal to cover a missing or damaged mica sheet can cause severe arcing, sparks, and potentially a fire in your microwave, leading to dangerous electrical hazards and irreversible damage to the appliance.
How often should a microwave mica sheet be replaced?
The replacement frequency depends on usage and maintenance. With regular cleaning and careful use, a mica sheet can last for several years. However, if you notice any signs of burning, sparking, holes, or discoloration, it should be replaced immediately, regardless of how long it has been installed.