Upgrading your kitchen with an over-the-range (OTR) microwave oven is a fantastic way to free up valuable counter space and add a sleek, modern touch. While the idea of installing a new appliance can seem daunting, learning How To Install An Over-the-Range Microwave Yourself is a surprisingly achievable DIY project with the right guidance and tools. This comprehensive guide will walk you through every step, ensuring a safe and successful installation, allowing you to enjoy the convenience of your new microwave in no time.
Before You Begin: Essential Preparation
A successful over-the-range microwave installation hinges on thorough preparation. Taking the time to get these initial steps right will save you headaches down the road and ensure a safe working environment.
Safety First: Disconnecting Power
|
Our Picks for the Best Microwave oven in 2026
As an Amazon Associate I earn from qualifying purchases.
|
||
| Num | Product | Action |
|---|---|---|
| 1 | COMFEE CMO-C20M1WH Retro Microwave with 11 power levels, Fast Multi-stage Cooking, Turntable Reset Function Kitchen Timer, Speedy Cooking, Weight/Time Defrost, Memory function, Children Lock, 700W |

|
| 2 | TOSHIBA EM131A5C-SS Countertop Microwave Ovens 1.2 Cu Ft with 12.4" Removable Turntable Smart Humidity Sensor, 12 Auto Menus Mute Function ECO Mode Easy Clean Interior, 1000W, Silver |
|
| 3 | GASLAND 30 Inch Over-the-Range Microwave Oven, 1.7 Cu.Ft Over Stove Microwave, 1000W with 10 Power Levels, Sensor & One-Touch Cooking, 300 CFM Venting, LED Cooktop Light, Black Kitchen Microwave |
|
| 4 | COMFEE' EM720CPL-PMB Countertop Microwave Oven with Sound On/Off, ECO Mode and Easy One-Touch Buttons, 0.7cu.ft, 700W, Black |
|
| 5 | COMFEE' Retro Small Microwave Oven With Compact Size, 9 Preset Menus, Position-Memory Turntable, Mute Function, Countertop Microwave For Small Spaces, 0.7 Cu Ft/700W, Green, AM720C2RA-G |
|
| 6 | BLACK+DECKER EM720CB7 Digital Microwave Oven with Turntable Push-Button Door, Child Safety Lock, 700W, Stainless Steel, 0.7 Cu.ft |
|
| 7 | COMFEE' Retro Small Microwave Oven With Compact Size, 9 Preset Menus, Position-Memory Turntable, Mute Function, Countertop Perfect For Spaces, 0.7 Cu Ft/700W, Cream, AM720C2RA-A |
|
| 8 | TOSHIBA EM131A5C-BS Countertop Microwave Ovens 1.2 Cu Ft, 12.4" Removable Turntable Smart Humidity Sensor 12 Auto Menus Mute Function ECO Mode Easy Clean Interior Black Color 1000W |
|
| 9 | COMFEE' Retro Small Microwave Oven With Compact Size, 9 Preset Menus, Position-Memory Turntable, Mute Function, Countertop, Perfect For Small Spaces, 0.7 Cu Ft/700W, Red, AM720C2RA-R |
|
| 10 | Chefman Countertop Microwave Oven 0.7 Cu. Ft., 700 Watts with 10 Power Levels, 6 Cooking Presets with One-Touch Express Cook, Eco Mode, Child Safety Lock, & Mute Button - Black |
|
Before touching any wires or tools, your top priority must be safety. Always begin by turning off the power to your kitchen at the main electrical panel. You should also unplug your range and carefully move it out of the way to create a clear and protected workspace. Lay down a drop cloth or old towel on the floor to prevent any mess or damage.
Gather Your Tools and Materials
Having all your tools and materials readily accessible is key to a smooth installation. You’ll typically need:
- Measuring Tape and Pencil: For accurate measurements and markings.
- Level: To ensure your microwave is perfectly straight.
- Drill and Drill Bits: For creating pilot holes for screws and bolts.
- Stud Finder: Essential for locating wall studs, which provide critical support.
- Screwdriver (Phillips and Flathead): For various fasteners.
- Masking Tape: To hold templates in place.
- Scissors: For cutting templates.
- Mounting Template(s): Usually included with your new microwave, these are invaluable for precise placement.
- Mounting Plate/Bracket: Also included, this metal plate attaches to the wall and supports the microwave.
- Toggle Bolts/Lag Screws: Hardware for securing the mounting plate and the microwave.
- Clamps and Tin Snips (Optional): If you’re installing a ducted ventilation system.
Always consult your microwave’s owner’s manual for a specific list of tools and hardware, as these can vary by model.
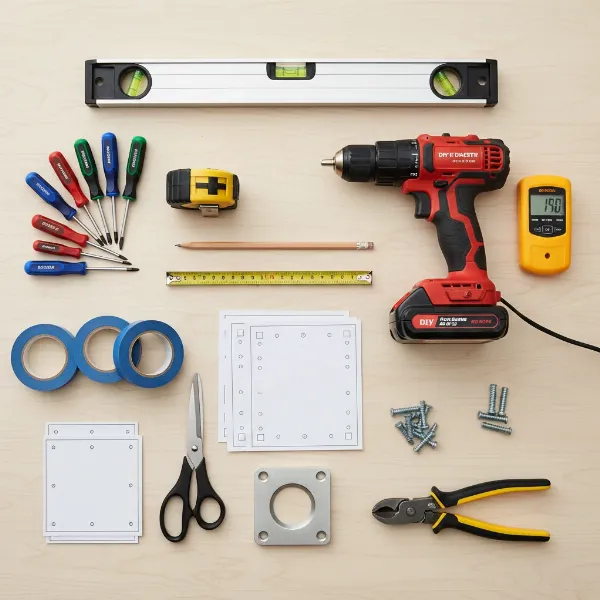 Essential tools and materials for installing an over-the-range microwave oven
Assess Your Space and Existing Setup
Before installation, confirm your space is suitable for an over-the-range microwave. Standard dimensions are typically around 30 inches wide, 15-16 inches deep, and 16-18 inches high, though some models may be 24 or 36 inches wide. Most over-the-range microwaves require about 12 to 13 inches of clearance above your range and approximately 66 inches from the top of the appliance to the floor. If you have a wall on the left side, ensure a minimum of 6 inches of clearance for the door to open fully.
Crucially, you’ll need a dedicated 15-amp electrical outlet located inside the upper cabinet directly above where the microwave will sit. If you don’t have one, it’s highly recommended to consult a professional electrician for proper installation before proceeding.
Next, consider your ventilation. Over-the-range microwaves offer two primary types:
- Recirculating (Ductless): These microwaves filter air through a charcoal filter and vent it back into the kitchen. They are generally easier to install as they don’t require external ductwork, making them suitable for homes without existing ventilation systems.
- Ducted (Vented): These models connect to external ductwork that expels smoke and odors outside your home. They are more effective at removing cooking byproducts but require more complex installation involving cutting an opening for the duct and connecting it to your home’s exterior vent. Decide which type you have and plan accordingly.
Removing Your Old Over-the-Range Microwave (If Applicable)
If you’re replacing an existing over-the-range microwave, carefully follow these steps for safe removal:
- Turn off Power: Reconfirm the power to the kitchen circuit is off.
- Unscrew Top Bolts: Open the upper cabinet doors directly above the microwave. You’ll typically find two or three large bolts extending down into the top of the microwave. Unscrew these.
- Disconnect Venting (If Ducted): If your old unit was ducted, you may need to disconnect a section of ductwork inside the upper cabinet or from the back of the microwave itself.
- Unplug: Locate the power cord inside the upper cabinet and unplug it from the outlet.
- Remove Microwave: This step absolutely requires a helper. While one person supports the front bottom of the microwave, the other can tilt the unit down slightly and carefully lift it off the wall mounting bracket. Once it’s free, gently lower it and set it aside.
Step-by-Step Installation Process
With the preparatory work complete, you’re ready for the main installation. Remember to work carefully and consult your owner’s manual for any model-specific instructions.
1. Marking and Drilling: The Mounting Plate
The mounting plate is the backbone of your microwave’s support, so precise placement is vital.
- Locate Wall Studs: Use a stud finder to locate the vertical wooden studs behind your wall in the area where the mounting plate will go. Mark their locations with your pencil. The mounting plate must be anchored to at least one wall stud for proper support; two is even better.
- Position the Rear Wall Template: Your microwave should come with a cardboard rear wall template. Tape this template to the wall, centering it above your range. Align the bottom edge of the template with the line indicating the bottom of your upper cabinet, and ensure it’s perfectly level using your spirit level.
- Mark Drill Holes: Using the template, mark the locations for the mounting plate screws, paying close attention to where they align with your previously marked wall studs. Also, mark any holes for ventilation if you have a ducted system.
- Drill Pilot Holes: Remove the template. Using an appropriate drill bit (check your manual for size), drill pilot holes at the marked locations. For holes that align with studs, use a smaller bit for lag screws. For holes where there’s no stud, you’ll typically use a larger bit for toggle bolts.
- Secure the Mounting Plate: Align the mounting plate with your drilled holes. Insert lag screws into the studs and toggle bolts (if needed) into the non-stud locations, securing the plate firmly to the wall. Ensure it remains level and flush.
2. Preparing the Upper Cabinet
The upper cabinet needs to be ready to receive the microwave’s power cord and the top mounting bolts.
- Empty the Cabinet: Remove everything from the upper cabinet above the installation area.
- Position the Upper Cabinet Template: Tape the upper cabinet template (if provided) to the bottom of the upper cabinet. Ensure it’s centered and aligned with the rear wall.
- Drill Holes: Use your drill to create the holes indicated on the template for the power cord and the top mounting bolts. The power cord hole is usually larger and allows the cord to pass into the cabinet. The bolt holes will be for securing the top of the microwave.
3. Configuring Ventilation (Ducted Models)
If you have a ducted microwave, this step is critical for proper airflow. Recirculating models can skip this.
- Cut Exhaust Opening: If your wall or cabinet doesn’t have an existing exhaust opening, use the template provided with your microwave to mark and cut the necessary opening for the exhaust duct. This often involves cutting through the back of the cabinet and possibly the exterior wall.
- Connect Ductwork: Attach the exhaust adapter (usually included with the microwave) to the microwave itself, ensuring any dampers can open and close freely. Connect your home’s existing ductwork (or new ductwork you’ve installed) to this adapter, securing all joints with metal tape or clamps for an airtight seal.
4. Lifting and Securing the Microwave (Teamwork is Key)
This is the most physically demanding part of the installation and requires a second person for safety and success.
- Prepare the Microwave: Before lifting, ensure all internal packaging is removed from the microwave. You may want to tape the microwave door shut to prevent it from swinging open unexpectedly during the lift.
- Lift into Position: With your helper, carefully lift the microwave. One person should support the bottom, while the other guides the top.
- Feed the Power Cord: As you lift, feed the microwave’s power cord through the designated hole in the bottom of the upper cabinet.
- Hook onto Mounting Plate: Tilt the microwave slightly towards you and hook the slots on the back of the microwave over the lower tabs of the previously installed wall mounting plate.
- Rotate and Push: Once hooked, rotate the microwave upward and push it firmly against the wall and the underside of the upper cabinet. Your helper should maintain this position, holding the microwave securely.
- Insert and Tighten Bolts: While your helper supports the microwave, go to the upper cabinet. Insert the long mounting bolts (provided with the microwave) through the drilled holes in the cabinet bottom and into the corresponding receivers on the top of the microwave. Tighten these bolts securely, ensuring the microwave is snug against the wall and cabinet.
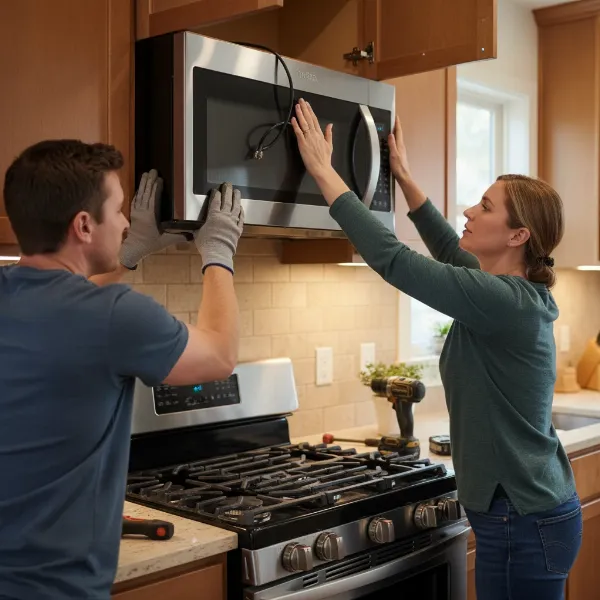 Two individuals carefully lifting and securing an over-the-range microwave into position above a stove.
5. Final Connections and Testing
You’re almost done! A few final checks and tests will ensure your new over-the-range microwave is fully functional.
- Plug In: Go back into the upper cabinet and plug the microwave’s power cord into the dedicated electrical outlet.
- Test Functionality: Place a cup of water inside the microwave and close the door. Set it to heat for a minute or two to ensure it’s heating properly. Test the fan and the interior/exterior lights to confirm everything is working as expected. Listen for any unusual noises.
- Clean Up: Remove any protective coverings, clean up your workspace, and reposition your range.
Maintaining Your New Over-the-Range Microwave
Once your over-the-range microwave installation is complete, a little regular maintenance will keep it running efficiently and extend its lifespan.
- Regular Cleaning: Wipe down the interior and exterior regularly with a damp cloth and mild detergent to prevent food splatters and grease from building up. For stubborn odors, place a bowl of water with lemon slices or white vinegar inside and microwave for a few minutes.
- Filter Replacement: If you have a recirculating (ductless) microwave, the charcoal filter needs to be replaced approximately every six months, or more frequently with heavy use, to maintain effective odor removal. Grease filters, found underneath the microwave, should be cleaned regularly or replaced if heavily soiled.
- Basic Troubleshooting: If your microwave isn’t working, first check if it’s plugged in and the circuit breaker hasn’t tripped. Ensure the door is fully closed. If sparks occur, immediately stop the microwave and check for any metal objects inside. For persistent issues or instability after installation, consider contacting a professional.
Safety Considerations
While installing an over-the-range microwave yourself is manageable, always keep safety in mind.
- No Metal: Never use metal containers, aluminum foil (unless specified by the manufacturer), or dishes with metallic trim inside the microwave.
- Proper Clearance: Ensure there’s adequate clearance around the microwave as specified in the manual for proper ventilation and door operation.
- Professional Help: Do not attempt to modify electrical wiring or structural components of your home without proper expertise. If you encounter unexpected electrical issues or structural concerns, hire a qualified electrician or contractor.
Conclusion: Enjoy Your Upgraded Kitchen
Installing an over-the-range Microwave Oven yourself is a rewarding project that transforms your kitchen by adding convenience and a cleaner aesthetic. By following these detailed steps, ensuring all safety precautions are met, and getting a helping hand for the lifting, you can confidently undertake this home improvement task. You’ll not only save on professional installation costs but also gain a deeper understanding of your home appliances.
Now that your new over-the-range microwave is sparkling and ready, aren’t you excited to try out a new recipe and enjoy the spaciousness of your revitalized countertop?
Frequently Asked Questions
Do I really need a helper to install an OTR microwave?
Yes, absolutely. Over-the-range microwaves are heavy and awkward to lift, especially into an overhead space. Attempting to lift and secure it by yourself is dangerous and can lead to injury or damage to the appliance or your home. A second person is essential for safely positioning and holding the microwave while it’s being bolted into place.
What’s the difference between recirculating and ducted ventilation?
Recirculating (ductless) ventilation filters air through a charcoal filter and releases it back into the kitchen, primarily reducing odors. Ducted (vented) ventilation connects to an external duct system that expels cooking fumes, smoke, and moisture outside your home, offering superior air purification. The choice depends on your home’s existing setup and local building codes.
How much clearance should an OTR microwave have above the range?
Typically, an over-the-range microwave requires 12 to 13 inches of clearance between the top of your cooking surface and the bottom of the microwave. Additionally, ensure the top of the microwave is approximately 66 inches from the floor to accommodate comfortable use. Always check your specific model’s manual for exact recommendations.
Can I install an OTR microwave if I don’t have a dedicated electrical outlet?
It is strongly recommended to have a dedicated 15-amp electrical outlet in the upper cabinet above the installation area. If one is not present, you should consult a licensed electrician to install one. Attempting to tap into existing circuits or using extension cords can be a fire hazard and may violate electrical codes.
How often should I clean or replace my microwave filter?
For recirculating over-the-range microwaves, the charcoal filter should be replaced approximately every six months, or more frequently if you cook often, to maintain effective odor absorption. The metal grease filters, usually located underneath the microwave, should be cleaned monthly with warm, soapy water to prevent grease buildup and ensure proper airflow.