Imagine you’re ready to heat up a delicious meal, but your microwave refuses to start, displaying a frustrating “door open” message or simply not engaging. A broken microwave door latch is a common issue that can bring your kitchen routine to a halt, but often, it’s a problem you can tackle yourself. This guide will walk you through diagnosing, safely repairing, and even preventing common microwave door latch problems, helping you restore your appliance to full functionality.
Understanding Your Microwave Door Latch
Before diving into repairs, it’s helpful to understand the crucial role your microwave door latch plays. More than just a simple closing mechanism, the latch system is integral to your appliance’s safe operation. When you close the microwave door, the latch hooks extend into the main cavity, engaging with a series of sensitive safety switches. These switches confirm that the door is securely shut, allowing the microwave to power on. If the latch is damaged or misaligned, these safety switches won’t activate, preventing the microwave from starting to protect you from harmful radiation exposure.
Historically, microwave door mechanisms have evolved from simpler mechanical catches to more intricate systems involving multiple interlock switches. This evolution underscores the critical importance of a properly functioning door for user safety and appliance efficiency.
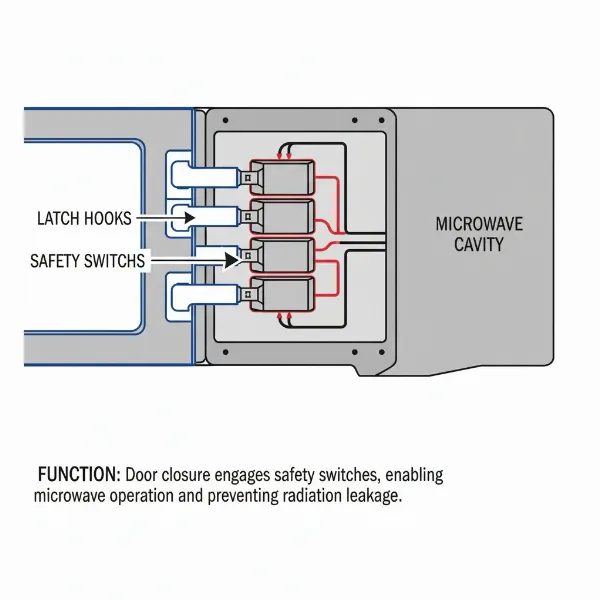 Diagram of microwave door latch mechanism with hooks and safety switches.
Common Microwave Door Latch Problems
Many issues can cause your microwave door latch to fail, ranging from simple wear and tear to more complex internal malfunctions. Recognizing the symptoms is the first step toward a successful repair.
Signs of a Faulty Latch
- Door won’t stay closed: The most obvious sign, indicating a lack of engagement from the latch hooks or insufficient tension.
- Microwave won’t start: Even if the door appears closed, the internal safety switches might not be activated.
- “Door” or “Open/Close Door” error message: Many modern microwaves display these warnings when the latch system is compromised.
- Loose or wobbly door: The door might feel unstable when closed, suggesting damage to the latch or hinges.
- Door requires force to close: This can indicate misalignment or a stiff mechanism.
|
Our Picks for the Best Microwave oven in 2026
As an Amazon Associate I earn from qualifying purchases.
|
||
| Num | Product | Action |
|---|---|---|
| 1 | Chefman Countertop Microwave Oven 0.7 Cu. Ft., 700 Watts with 10 Power Levels, 6 Cooking Presets with One-Touch Express Cook, Eco Mode, Child Safety Lock, & Mute Button - Black |

|
| 2 | COMFEE' Retro Small Microwave Oven With Compact Size, 9 Preset Menus, Position-Memory Turntable, Mute Function, Countertop Perfect For Spaces, 0.7 Cu Ft/700W, Cream, AM720C2RA-A |
|
| 3 | COMFEE CMO-C20M1WH Retro Microwave with 11 power levels, Fast Multi-stage Cooking, Turntable Reset Function Kitchen Timer, Speedy Cooking, Weight/Time Defrost, Memory function, Children Lock, 700W |
|
| 4 | BLACK+DECKER EM720CB7 Digital Microwave Oven with Turntable Push-Button Door, Child Safety Lock, 700W, Stainless Steel, 0.7 Cu.ft |
|
| 5 | TOSHIBA EM131A5C-SS Countertop Microwave Ovens 1.2 Cu Ft with 12.4" Removable Turntable Smart Humidity Sensor, 12 Auto Menus Mute Function ECO Mode Easy Clean Interior, 1000W, Silver |
|
| 6 | GASLAND 30 Inch Over-the-Range Microwave Oven, 1.7 Cu.Ft Over Stove Microwave, 1000W with 10 Power Levels, Sensor & One-Touch Cooking, 300 CFM Venting, LED Cooktop Light, Black Kitchen Microwave |
|
| 7 | TOSHIBA EM131A5C-BS Countertop Microwave Ovens 1.2 Cu Ft, 12.4" Removable Turntable Smart Humidity Sensor 12 Auto Menus Mute Function ECO Mode Easy Clean Interior Black Color 1000W |
|
| 8 | COMFEE' EM720CPL-PMB Countertop Microwave Oven with Sound On/Off, ECO Mode and Easy One-Touch Buttons, 0.7cu.ft, 700W, Black |
|
| 9 | COMFEE' Retro Small Microwave Oven With Compact Size, 9 Preset Menus, Position-Memory Turntable, Mute Function, Countertop, Perfect For Small Spaces, 0.7 Cu Ft/700W, Red, AM720C2RA-R |
|
| 10 | COMFEE' Retro Small Microwave Oven With Compact Size, 9 Preset Menus, Position-Memory Turntable, Mute Function, Countertop Microwave For Small Spaces, 0.7 Cu Ft/700W, Green, AM720C2RA-G |
|
Root Causes of Latch Failure
- Broken Latch Hooks: Often made of plastic, these hooks can crack or break with repeated use or forceful closing.
- Worn or Loose Springs: Springs provide the tension necessary for the latch to engage properly. If they become weak, detached, or break, the latch won’t function correctly.
- Misalignment: The door or the latch assembly itself can shift over time, preventing the hooks from properly entering their slots and activating the switches.
- Faulty Door Switches: These electrical components are designed to complete a circuit when the door is closed. If a switch fails, the microwave won’t receive the “all clear” signal to operate.
- Accumulated Debris: Food particles, grease, or dirt can build up around the latch mechanism, physically blocking its movement.
- Worn or Sagging Hinges: The door hinges support the microwave door. If they wear out or become loose, the door can sag, misaligning the latch.
- Physical Damage: Accidental impact or frequently slamming the door can bend the door frame or damage the latch components.
Understanding these common problems and their underlying causes will help you accurately diagnose the issue with your microwave’s door latch.
Essential Safety Precautions Before Repair
Working with a microwave, even when unplugged, carries inherent risks due to high-voltage capacitors that can store a lethal electrical charge for an extended period. Your safety is paramount.
Always follow these critical safety steps:
- Unplug the Microwave: Before you touch any part of the appliance, disconnect it from the power outlet. This is the single most important step.
- Discharge the High-Voltage Capacitor (If Necessary): If your repair requires opening the outer cabinet and accessing internal components beyond the door assembly, you must discharge the high-voltage capacitor. This procedure is dangerous and should only be attempted by individuals with electrical expertise. If you are not confident, it is safer to call a professional. Never touch internal components without confirming the capacitor is discharged.
- Wear Protective Gear: Use insulated gloves and safety glasses to protect against sharp edges, broken plastic, or accidental electrical contact.
- Use the Right Tools: Ensure you have the proper tools for the job, such as screwdrivers (Phillips and flathead), needle-nose pliers, and potentially a multimeter for testing switches.
- Work in a Well-Ventilated Area: This helps prevent the buildup of any fumes or particles if you need to clean components.
- Never Bypass Safety Switches: It is incredibly dangerous to tape, bypass, or defeat a microwave door switch. These interlocks are vital safety features designed to prevent radiation leakage.
“Safety isn’t just a suggestion—it’s a requirement,” emphasizes a technician from CLT Appliance. “If you’re ever uncertain, it’s better to be safe and contact a professional for prompt assistance.”
Tools and Materials for DIY Repair
Having the right tools ready will make your repair process smoother and more efficient. For most common door latch fixes, you’ll need:
- Screwdriver Set: Both Phillips and flathead screwdrivers for various screw types.
- Needle-Nose Pliers: Essential for manipulating small springs and wires.
- Multimeter (Optional but Recommended): For testing electrical components like door switches.
- Camera/Smartphone: To take photos during disassembly, helping you remember how components connect.
- Replacement Parts: Depending on your diagnosis, you might need new door latch hooks, springs, a complete latch assembly, or micro switches. Always ensure you order parts specific to your microwave’s make and model.
- Cleaning Supplies: Mild detergent, soft cloths, and possibly a toothbrush for removing debris.
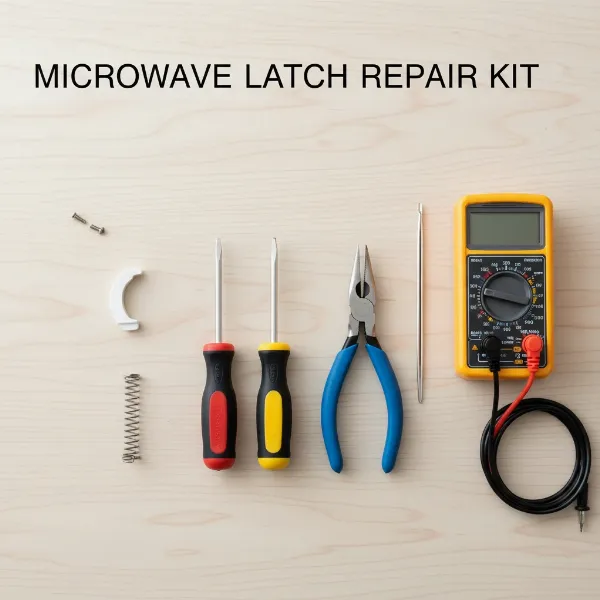 Essential tools and replacement parts for DIY microwave door latch repair.
Step-by-Step Guide to Fixing Your Microwave Door Latch
Once you’ve diagnosed the issue and gathered your tools, it’s time to tackle the repair. Remember to keep safety first at every stage.
Step 1: Initial Inspection and Cleaning
Begin by visually inspecting the door and its frame.
- Check for Debris: Look for food particles, grease, or dirt obstructing the latch mechanism or the slots in the microwave frame where the hooks enter. A thorough cleaning with a damp cloth and mild detergent can sometimes resolve the issue.
- Examine the Door Hooks: With the door open, visually inspect the plastic hooks on the door itself. Are they cracked, broken, or excessively worn?
- Assess Door Alignment: Gently open and close the door several times. Does it feel loose, wobble, or appear to sag? Check if the door sits flush with the microwave frame when closed.
Step 2: Repairing or Replacing the Door Hook or Spring
This is often the simplest fix.
- Access the Door Latch Area: For many models, you’ll need to remove the screws securing the inner door panel. Carefully separate the inner and outer door panels.
- Inspect Springs: Look for any loose or broken springs connected to the latch hooks. Sometimes, a spring might have simply detached and can be reattached using needle-nose pliers. If a spring is broken, you’ll need to replace it with an identical one.
- Repairing a Broken Hook (Temporary/DIY Hack): If a plastic hook is broken but the spring is still functional, a temporary fix might involve drilling a small hole into the remaining plastic tab to reattach the spring. However, this is often a short-term solution.
- Replacing the Door Hook: If the hook itself is broken or worn, remove the damaged hook and install a new one. Ensure it moves freely and engages correctly.
- Reassemble: Carefully reattach the inner door panel, ensuring all screws are tightened (but not overtightened).
Step 3: Addressing Latch Assembly Issues
If the door hooks and springs appear fine, the problem might lie within the latch assembly inside the microwave body.
- Unplug and Access: After unplugging, you’ll typically need to remove the outer cabinet screws (usually at the back and sides) and slide off the outer cover to access the internal components.
- Locate the Latch Assembly: This unit is usually located near the door’s opening, behind the control panel.
- Photograph Wiring: Before disconnecting any wires, take clear photos of all connections. This is crucial for correct reassembly.
- Remove and Inspect: Remove the screws holding the assembly, disconnect the wires, and carefully remove the old latch assembly. Inspect it for any physical damage, wear, or misalignment.
- Install New Latch Assembly: Align the new latch assembly with its mounting slots, secure it with screws, and reconnect all wires according to your photos. Ensure the new assembly moves freely.
- Reassemble: Carefully reattach the outer cabinet.
Step 4: Testing and Replacing Door Switches
Faulty door switches are a common cause of a microwave not starting.
- Access Switches: With the outer cabinet still open (and the microwave unplugged!), locate the door switches near the latch assembly. There are typically two to three micro-switches.
- Test with Multimeter: Use a multimeter to test each switch for continuity. A properly functioning switch will show continuity when pressed and no continuity when released (or vice-versa, depending on its normal state). If a switch fails the test, it needs replacement.
- Replace Switches: Take a photo of the switch orientation and wiring. Disconnect the faulty switch’s wires, remove its mounting screws, and install the new switch. Reconnect the wires.
- Reassemble: Ensure all switches are correctly positioned before reassembling the outer cabinet.
Step 5: Final Testing
After any repair, thorough testing is crucial for both functionality and safety.
- Plug In and Close: Plug the microwave back into the outlet. Close the door firmly; you should hear a clear click as the latch engages.
- Functionality Test: Place a cup of water inside and run the microwave for 30 seconds. Confirm that it starts, heats the water, and stops as expected.
- Safety Interlock Test: While the microwave is running with the water inside, briefly open the door. The microwave should immediately stop. If it continues to run or operate with the door even slightly ajar, unplug it immediately and do not use it. This indicates a critical safety interlock failure, and professional assistance is required.
“A working microwave door latch keeps your appliance safe and reliable,” notes an appliance repair expert. “Most door latch issues can be resolved with careful inspection, cleaning, and replacement of parts.”
When to Call a Professional
While many door latch issues are DIY-friendly, some situations warrant professional intervention.
- High-Voltage Capacitor Concerns: If your repair involves accessing internal components and you are uncomfortable or unfamiliar with discharging the high-voltage capacitor, call a technician.
- Persistent “Door” Errors: If you’ve attempted basic troubleshooting and the microwave still displays a door error, or if you consistently need to lift or press the door to make it start, a deeper issue might be at play.
- Visible Damage to the Microwave Frame: A bent or damaged frame can permanently affect door alignment and may pose safety risks.
- Electrical or Electronic Failures: Complex issues related to the control board or other electrical components should be handled by a certified technician.
- Unusual Symptoms: If you notice sparks, burning smells, or any other abnormal behavior after a repair attempt, unplug the microwave immediately and seek professional help.
Professional repair costs typically range from $100-$200, including labor and parts, whereas DIY parts might cost $20-$50. Weigh the cost of professional service against the potential risks and your comfort level with electrical repairs.
Preventive Maintenance Tips
Regular care can significantly extend the life of your microwave door latch and prevent future problems.
- Gentle Handling: Avoid slamming the microwave door. A gentle push is all that’s needed to engage the latch.
- Regular Cleaning: Periodically wipe down the door, frame, and latch mechanism to prevent food debris and grease from accumulating and hindering its movement.
- Check for Alignment: Occasionally check if your door closes flush and feels firm. If you notice any wobbling or resistance, address it early.
- Don’t Overload: Avoid placing excessively heavy items on the open microwave door, which can stress the hinges and lead to misalignment.
- Address Issues Promptly: Don’t ignore minor issues. A loose spring or slightly misaligned door can worsen over time.
By incorporating these simple maintenance habits, you can keep your microwave’s door latch functioning smoothly and safely for years to come.
Conclusion: Ensuring Long-term Microwave Door Functionality
A broken microwave door latch can be a significant inconvenience, but with a systematic approach to diagnosis and repair, you can often restore your appliance to perfect working order. From understanding the core components to meticulously following safety guidelines and step-by-step repair instructions, empowering yourself with this knowledge is key. Remember to prioritize safety above all, and don’t hesitate to consult a professional if the repair seems too complex or poses a risk.
Regular maintenance and gentle handling will ensure your microwave door continues to function reliably, keeping your kitchen safe and efficient. What small step will you take today to extend the life of your microwave?
Frequently Asked Questions
Why does my microwave say “door” even when it’s closed?
This typically indicates that one or more of the internal safety switches are not engaging properly, even if the door appears to be shut. Common culprits include a misaligned latch, a broken door hook, or a faulty micro switch.
Is it safe to use a microwave with a broken door latch?
No, it is highly unsafe to use a microwave with a broken door latch. The latch system is a critical safety interlock designed to prevent the microwave from operating if the door is not securely sealed, thus protecting you from harmful radiation leakage.
How much does it cost to repair a microwave door latch?
The cost can vary. DIY repairs involving simple part replacements (like a hook or spring) might cost $20-$50 for parts. Professional repairs, including labor and potentially a new latch assembly or switch, typically range from $100-$200.
Can I glue a broken microwave door latch?
While some strong adhesives might offer a temporary fix for a broken plastic latch hook, it is generally not a durable or recommended solution. The latch experiences significant stress with each use, making glued repairs prone to re-breaking and potentially compromising safety. Replacing the part is always the better long-term option.
How long should a microwave door latch last?
With proper care and gentle use, a microwave door latch can often last the entire lifespan of the appliance. However, factors like frequent use, forceful closing, or lack of cleaning can shorten its durability and lead to premature failure.