There’s nothing quite like the vibrant aroma and taste of fresh herbs to elevate any dish. Yet, how often do those beautiful bunches of parsley, basil, or thyme bought for a single recipe end up wilting sadly in the fridge? Don’t let your garden’s bounty or grocery store finds go to waste. The secret to preserving their essence, quickly and efficiently, might already be sitting on your kitchen counter: your microwave. Forget lengthy air-drying processes or energy-intensive dehydrators; drying herbs in the microwave is a game-changer, delivering perfectly crisp, flavorful herbs in under a minute, ready to infuse your cooking all year long.
What is Microwave Herb Drying?
Microwave herb drying is a rapid dehydration method that uses microwave energy to quickly evaporate moisture from fresh herb leaves. This process effectively preserves the herbs by removing the water content that leads to spoilage, while largely retaining their color, aroma, and essential oils. Unlike traditional drying methods that can take days or weeks, the microwave dramatically speeds up the process, making it a convenient solution for preserving small batches of herbs on demand.
Why Choose Microwave Drying?
When it comes to preserving herbs, speed and quality are paramount. The microwave method stands out for several compelling reasons. Primarily, it’s incredibly fast, transforming fresh leaves into dry, crumbly herbs in mere minutes. This rapid dehydration minimizes the loss of volatile aromatic compounds, which are responsible for the herbs’ distinct flavors and scents. As a result, microwave-dried herbs often boast a more intense flavor and vibrant color compared to those dried through air-drying or in a conventional oven. It’s also remarkably simple, requiring no specialized equipment beyond your microwave, a plate, and some paper towels, making it an accessible technique for any home cook.
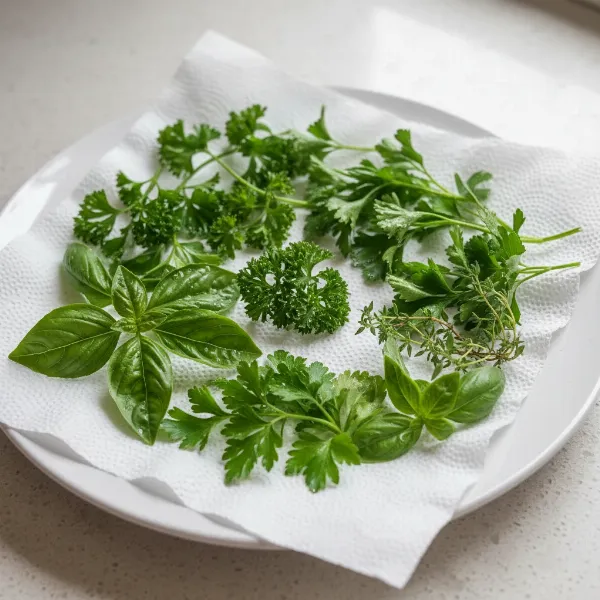 Fresh herbs like basil and parsley arranged on paper towels on a microwave-safe plate, ready for drying.
Best Herbs for Microwave Drying
The good news is that most herbs can be successfully dried in the microwave, though some yield better results than others.
Hearty Herbs: These are generally the best candidates for microwave drying due to their robust structure and less volatile aromatic compounds. They tend to retain their flavor and color exceptionally well.
- Rosemary
- Thyme
- Oregano
- Sage
- Marjoram
- Savory
- Mint
Delicate Herbs: While these herbs can be microwaved, they may lose a bit more of their subtle flavor compared to their fresh counterparts. However, the microwave method still produces a superior result to other drying techniques for these varieties.
- Parsley
- Basil
- Cilantro
- Tarragon
- Dill
- Chives
It’s important to monitor delicate herbs closely, as they dehydrate faster and can be more prone to scorching. Avoid any herbs that are already slimy or discolored; choose only fresh, vibrant leaves for the best outcome.
Step-by-Step Guide: Drying Herbs in Your Microwave
Drying herbs in the microwave is incredibly straightforward. Follow these simple steps for perfectly preserved herbs every time:
-
Preparation is Key:
- Wash and Pat Dry: Gently rinse your fresh herbs under cool water to remove any dirt or debris. Thoroughly pat them dry with a clean kitchen towel or paper towels. Excess moisture will steam the herbs rather than dry them.
- Remove Stems: For most leafy herbs like basil, parsley, or mint, strip the leaves from the thicker stems. For woodier herbs like rosemary or thyme, you can leave smaller, tender stems attached as they dry well.
-
Arrange for Success:
- Line Your Plate: Place two layers of plain, white paper towels on a microwave-safe plate. Avoid recycled paper towels, as they can contain tiny metal fragments that may spark in the microwave.
- Single Layer: Arrange the herb leaves in a single layer on the paper towels. Ensure they do not overlap; overcrowding will lead to uneven drying.
- Cover: Place another single layer of paper towel over the herbs. This helps absorb additional moisture and prevents the lighter leaves from scattering as they dry.
-
Microwaving in Bursts:
- Initial Blast: Microwave the herbs on high power.
- For hearty herbs, start with 60 seconds.
- For delicate herbs, start with 30-40 seconds.
- Check and Continue: After the initial interval, carefully check the herbs. They should feel somewhat dry but likely still pliable.
- Short Bursts: Continue microwaving in 10-20 second intervals, checking after each burst. The total time will vary depending on your microwave’s wattage, the type of herb, and the quantity.
- Desired Crispness: The herbs are fully dried when they are crisp and crumble easily between your fingers. They should not feel leathery or rubbery. If the paper towels become too damp during the process, replace them with fresh ones.
- Initial Blast: Microwave the herbs on high power.
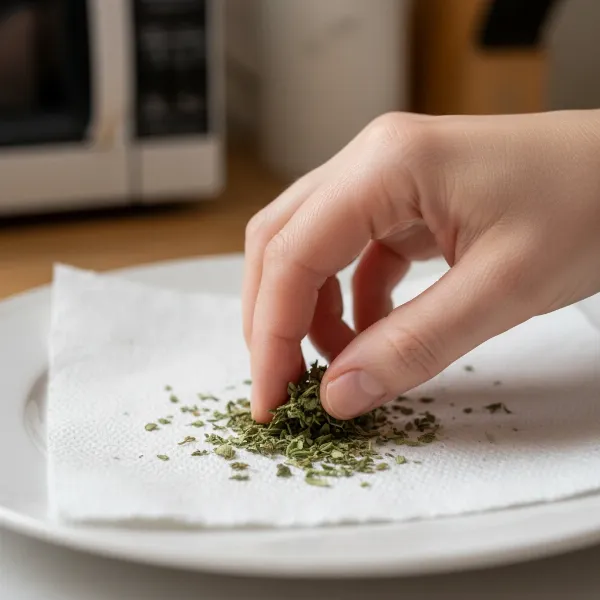 A hand gently checking crispy, microwave-dried herbs on a paper towel, illustrating the final stage of dehydration.
- Cooling and Storage:
- Cool Completely: Once dried, remove the herbs from the microwave and let them cool completely on the plate. They will become even crispier as they cool.
- Crumble and Store: Once cool, you can gently crumble the herbs with your fingers, or for a finer consistency, use a mortar and pestle or a clean coffee grinder.
- Airtight Containers: Store your dried herbs in airtight containers or spice jars in a cool, dark, and dry pantry. Properly stored, they can last for several months, maintaining their flavor and aroma.
Safety Tips for Microwave Herb Drying
While microwave drying is fast and effective, a few precautions ensure safety and the best results:
- Avoid Recycled Paper Towels: As mentioned, recycled paper products can sometimes contain small metal flecks that can cause arcing or even fires in a microwave. Stick to plain, white, non-recycled paper towels.
- Do Not Overload: Drying too many herbs at once will lead to uneven dehydration and may increase the risk of scorching or burning. Always spread them in a single layer.
- Stay Vigilant: Never leave your microwave unattended while drying herbs. Herbs can go from perfectly dry to scorched very quickly. Keep a close eye on them, especially during the final bursts. If you notice any smoke or a burning smell, immediately stop the microwave.
- Allow for Air Circulation: Ensure your microwave’s ventilation is unobstructed.
Tips for Optimal Results
Achieving perfectly dried herbs every time involves a few nuanced considerations:
- Even Layers: The more evenly your herbs are spread in a single layer, the more consistently they will dry. Overlapping leaves will result in some being dry while others remain moist.
- Know Your Microwave: Microwave wattage varies, so the exact timing will differ. Start with shorter intervals and adjust as needed. Once you’ve dried a specific herb, make a note of the optimal time for future reference.
- Don’t Over-Dry: While you want them crisp, over-drying can lead to a loss of flavor and an increased risk of burning. Stop when they are just brittle enough to crumble.
- Consider Purpose: For garnishes, you might want whole, beautifully dried leaves. For seasoning, crumbling or grinding them into a powder will release more flavor.
- Humidity Matters: On very humid days, herbs may take slightly longer to dry. The paper towels will absorb more moisture, so be prepared to change them if they become saturated.
Comparison with Other Drying Methods
While air-drying offers a rustic charm, it’s a slow process, often taking weeks, and can lead to faded colors and less potent flavors, especially in humid climates. Oven drying, while faster, can also risk “cooking” the herbs at too high a temperature, diminishing their delicate oils and leading to a less vibrant product. Dedicated dehydrators offer excellent results but are a costly investment for many. The microwave method strikes an ideal balance, offering speed, convenience, and superior preservation of color and flavor without the need for specialized equipment or a lengthy wait. It truly is the quickest route to preserving that garden-fresh taste.
Conclusion: Choosing the Best Microwave for Your Kitchen
Preserving fresh herbs using your microwave is a remarkably simple and efficient way to extend their shelf life and enjoy their vibrant flavors year-round. By following a few straightforward steps—washing, arranging, microwaving in short bursts, and proper storage—you can transform a wilting bunch into a pantry staple in a matter of minutes. This method excels in retaining the herbs’ color and potency, making it a favorite for home cooks seeking both speed and quality. Don’t let your culinary creations miss out on that fresh herb zest; embrace the microwave as your secret weapon for quick and effective herb preservation. What fresh herb will you dry first to enhance your next meal?
Frequently Asked Questions
Can I dry any amount of herbs in the microwave?
|
Our Picks for the Best Microwave oven in 2026
As an Amazon Associate I earn from qualifying purchases.
|
||
| Num | Product | Action |
|---|---|---|
| 1 | COMFEE' Retro Small Microwave Oven With Compact Size, 9 Preset Menus, Position-Memory Turntable, Mute Function, Countertop Microwave For Small Spaces, 0.7 Cu Ft/700W, Green, AM720C2RA-G |

|
| 2 | COMFEE' Retro Small Microwave Oven With Compact Size, 9 Preset Menus, Position-Memory Turntable, Mute Function, Countertop Perfect For Spaces, 0.7 Cu Ft/700W, Cream, AM720C2RA-A |
|
| 3 | TOSHIBA EM131A5C-BS Countertop Microwave Ovens 1.2 Cu Ft, 12.4" Removable Turntable Smart Humidity Sensor 12 Auto Menus Mute Function ECO Mode Easy Clean Interior Black Color 1000W |
|
| 4 | COMFEE' Retro Small Microwave Oven With Compact Size, 9 Preset Menus, Position-Memory Turntable, Mute Function, Countertop, Perfect For Small Spaces, 0.7 Cu Ft/700W, Red, AM720C2RA-R |
|
| 5 | Chefman Countertop Microwave Oven 0.7 Cu. Ft., 700 Watts with 10 Power Levels, 6 Cooking Presets with One-Touch Express Cook, Eco Mode, Child Safety Lock, & Mute Button - Black |
|
| 6 | BLACK+DECKER EM720CB7 Digital Microwave Oven with Turntable Push-Button Door, Child Safety Lock, 700W, Stainless Steel, 0.7 Cu.ft |
|
| 7 | COMFEE' EM720CPL-PMB Countertop Microwave Oven with Sound On/Off, ECO Mode and Easy One-Touch Buttons, 0.7cu.ft, 700W, Black |
|
| 8 | TOSHIBA EM131A5C-SS Countertop Microwave Ovens 1.2 Cu Ft with 12.4" Removable Turntable Smart Humidity Sensor, 12 Auto Menus Mute Function ECO Mode Easy Clean Interior, 1000W, Silver |
|
| 9 | GASLAND 30 Inch Over-the-Range Microwave Oven, 1.7 Cu.Ft Over Stove Microwave, 1000W with 10 Power Levels, Sensor & One-Touch Cooking, 300 CFM Venting, LED Cooktop Light, Black Kitchen Microwave |
|
| 10 | COMFEE CMO-C20M1WH Retro Microwave with 11 power levels, Fast Multi-stage Cooking, Turntable Reset Function Kitchen Timer, Speedy Cooking, Weight/Time Defrost, Memory function, Children Lock, 700W |
|
For best results, dry small batches of herbs at a time. A single layer on a plate ensures even drying. Overloading the plate can lead to uneven dehydration and potential burning.
How long do microwave-dried herbs last?
When stored in airtight containers in a cool, dark, dry place, microwave-dried herbs can maintain their potency and flavor for up to 6 to 12 months, similar to commercially dried herbs.
What’s the best way to tell if my herbs are completely dry?
Your herbs are perfectly dry when they feel crispy to the touch and crumble easily when gently rubbed between your fingers. If they still feel pliable or have any softness, they need more time.
Can I use parchment paper instead of paper towels?
Yes, unbleached parchment paper can be used as an alternative to paper towels for lining your microwave-safe plate and covering the herbs. Ensure it is microwave-safe.
Why do some herbs lose more flavor when dried?
Delicate herbs like basil and cilantro contain more volatile aromatic compounds that evaporate more readily with moisture. While microwave drying preserves more flavor than other methods, some reduction is natural compared to their fresh state.