Ensuring a safe environment for curious toddlers and young children is a top priority for parents and caregivers. Child safety locks are essential tools that prevent access to hazardous areas, from kitchen cabinets filled with cleaning supplies to vehicle doors. Understanding the various types of locks and how to properly enable and disable them is crucial for effective childproofing.
Understanding Different Types of Child Safety Locks
Child safety locks come in a variety of designs, each suited for different applications within the home and vehicle.
Home Safety Locks
- Magnetic Locks: These locks are typically installed inside cabinets and drawers, making them invisible from the outside. They require a special magnetic “key” to disengage the lock and open the door or drawer. Many magnetic systems feature an on/off switch to temporarily disable them for adult convenience.
- Adhesive Strap Locks: Ideal for renters or those avoiding drilling, these locks attach with strong adhesive to cabinets, drawers, toilets, or appliances. They typically consist of two adhesive ends connected by a flexible strap or lever that secures the opening. Many adhesive locks include a mechanism to keep them unlocked when not needed.
- Slide Locks: These U-shaped plastic locks are designed to slide over cabinet handles or knobs, holding them together to prevent opening. They are often visible and require no installation tools.
- Spring-Loaded Latches: Installed inside cabinets or drawers, these latches allow the door or drawer to open a small amount (about an inch) before stopping. Adults can then press down on a spring-loaded mechanism to fully open it.
- Swivel Locks: These are screw-mounted latches that have an arm that swivels to either lock or unlock the cabinet or drawer. They can be pivoted out of the way when the lock is not needed.
- External Cabinet Locks: These are often the simplest and cheapest option, slipping over handles or knobs to prevent opening.
- Door Lever/Knob Covers: While not traditional “locks,” these covers fit over standard door handles, making them difficult for small hands to grip and turn, thus preventing access to rooms.
|
Our Picks for the Best Microwave oven in 2026
As an Amazon Associate I earn from qualifying purchases.
|
||
| Num | Product | Action |
|---|---|---|
| 1 | COMFEE' Retro Small Microwave Oven With Compact Size, 9 Preset Menus, Position-Memory Turntable, Mute Function, Countertop Microwave For Small Spaces, 0.7 Cu Ft/700W, Green, AM720C2RA-G |

|
| 2 | COMFEE CMO-C20M1WH Retro Microwave with 11 power levels, Fast Multi-stage Cooking, Turntable Reset Function Kitchen Timer, Speedy Cooking, Weight/Time Defrost, Memory function, Children Lock, 700W |
|
| 3 | Chefman Countertop Microwave Oven 0.7 Cu. Ft., 700 Watts with 10 Power Levels, 6 Cooking Presets with One-Touch Express Cook, Eco Mode, Child Safety Lock, & Mute Button - Black |
|
| 4 | TOSHIBA EM131A5C-SS Countertop Microwave Ovens 1.2 Cu Ft with 12.4" Removable Turntable Smart Humidity Sensor, 12 Auto Menus Mute Function ECO Mode Easy Clean Interior, 1000W, Silver |
|
| 5 | BLACK+DECKER EM720CB7 Digital Microwave Oven with Turntable Push-Button Door, Child Safety Lock, 700W, Stainless Steel, 0.7 Cu.ft |
|
| 6 | COMFEE' EM720CPL-PMB Countertop Microwave Oven with Sound On/Off, ECO Mode and Easy One-Touch Buttons, 0.7cu.ft, 700W, Black |
|
| 7 | COMFEE' Retro Small Microwave Oven With Compact Size, 9 Preset Menus, Position-Memory Turntable, Mute Function, Countertop, Perfect For Small Spaces, 0.7 Cu Ft/700W, Red, AM720C2RA-R |
|
| 8 | COMFEE' Retro Small Microwave Oven With Compact Size, 9 Preset Menus, Position-Memory Turntable, Mute Function, Countertop Perfect For Spaces, 0.7 Cu Ft/700W, Cream, AM720C2RA-A |
|
| 9 | GASLAND 30 Inch Over-the-Range Microwave Oven, 1.7 Cu.Ft Over Stove Microwave, 1000W with 10 Power Levels, Sensor & One-Touch Cooking, 300 CFM Venting, LED Cooktop Light, Black Kitchen Microwave |
|
| 10 | TOSHIBA EM131A5C-BS Countertop Microwave Ovens 1.2 Cu Ft, 12.4" Removable Turntable Smart Humidity Sensor 12 Auto Menus Mute Function ECO Mode Easy Clean Interior Black Color 1000W |
|
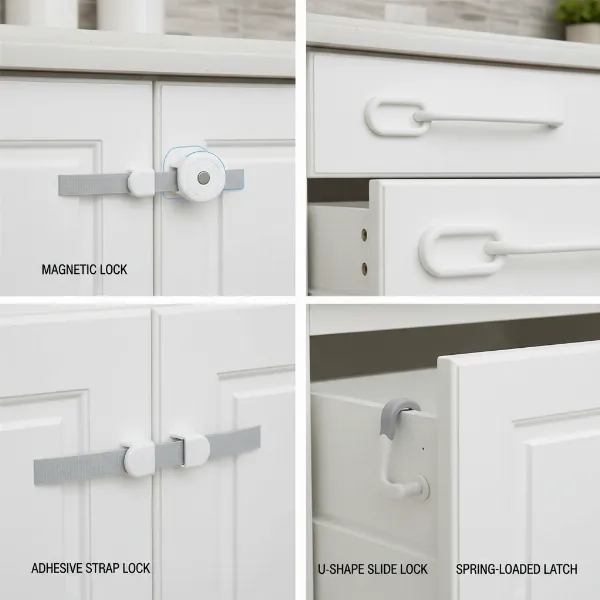 A collage of various home child safety locks including magnetic, strap, and slide types.
Vehicle Child Locks
Most cars are equipped with child locks on the rear doors. When enabled, these prevent the interior door handles from opening the doors, meaning children cannot accidentally (or intentionally) open a door while the vehicle is in motion or stopped.
How to Enable and Install Child Safety Locks
Proper installation is key to the effectiveness of any child safety lock. Always refer to the manufacturer’s specific instructions, as procedures can vary.
For Cabinet and Drawer Locks
- Preparation is Key: For adhesive-mounted locks, thoroughly clean and dry the surface where the lock will be applied, often with rubbing alcohol, to ensure optimal adhesion.
- Adhesive Locks (Magnetic, Straps):
- Peel off the adhesive backing.
- Carefully position the lock according to the instructions (some magnetic locks come with installation templates for precise alignment).
- Press firmly for 3-5 seconds (some recommend 15-20 seconds) to ensure a secure bond.
- Crucially, allow the adhesive to cure for at least 24 hours before actively using the lock. This waiting period ensures maximum strength.
- If the lock has an on/off switch, ensure it is in the “on” or locked position after curing.
- Screw-Mounted Locks (Spring-Loaded, Swivel):
- Mark the desired drilling locations on the inside of the cabinet or drawer, typically about one inch from the edge.
- Pre-drill pilot holes to prevent wood splitting.
- Align the lock components and secure them with the provided screws. Some may require a separate catch piece for frameless cabinets.
- Slide Locks and External Cabinet Locks:
- These require no tools. Simply slide the U-shaped lock through the cabinet handles or over the knobs and secure it in place according to its design.
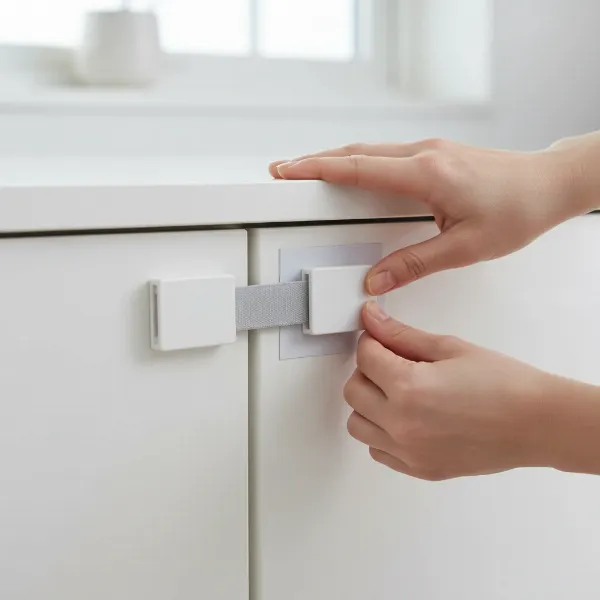 A close-up of a hand installing an adhesive strap child safety lock on a cabinet.
For Vehicle Child Locks
Enabling child locks in a vehicle usually involves a simple mechanism on the rear doors:
- Door Jamb Lever/Switch: Open the rear car door. Look for a small switch or lever on the side of the door (the door jamb). This might need to be flipped up or down.
- Key Turn: Some older models or specific designs may require you to insert your car key into a small slot on the door jamb and turn it to engage the lock.
- Driver’s Control Panel: In some modern vehicles, child locks for the rear doors can be activated electronically via a button on the driver’s side door panel, often near the window controls.
- Consult Your Vehicle Manual: The most accurate and specific instructions for your car will always be found in your vehicle’s owner’s manual.
How to Disable and Remove Child Safety Locks
Just as important as enabling them is knowing how to disable or remove child safety locks when they are no longer needed or for temporary convenience.
Temporary Disabling
Many child safety locks offer a temporary disable feature, which is useful when you need frequent access to a cabinet (e.g., during cooking or cleaning) or when adults are using the space.
- On/Off Switches: Many magnetic and adhesive locks have a physical switch that allows you to turn the locking mechanism off, leaving the cabinet or drawer accessible without the key or latch engagement.
- Rotating Latch Arms: Some adhesive latches can be rotated or pushed into an “unlocked” position, often indicated by a colored symbol (e.g., red for unlocked).
- Spring-Loaded Mechanisms: Certain spring-action cabinet locks can be held in an open position by pressing and sliding a component forward, allowing the cabinet to remain open without constant pressure.
Permanent Removal
When your child outgrows the need for safety locks, or if you need to replace them, removal should be done carefully to avoid damaging surfaces.
For Adhesive-Mounted Locks:
The primary concern with adhesive locks is removing them without stripping paint or leaving residue.
- Heat the Adhesive: Use a hairdryer on a warm setting and direct the hot air around the adhesive for 5-8 minutes. For locks that have been in place for a long time, it may take longer. The heat softens the adhesive, making it easier to remove.
- Gentle Prying/Sawing:
- Fingers: Once the adhesive is warm, gently try to pry up an edge with your fingernail and slowly peel the lock off.
- Dental Floss/Fishing Line: For stubborn locks, slide a piece of dental floss or fishing line behind the lock and use a sawing motion to cut through the softened adhesive.
- Plastic Shim: A plastic shim, such as a credit card or a plastic scraper, can be used to gently get under the adhesive and pry it off. Avoid sharp objects like metal knives that could scratch surfaces.
- Remove Residue: Any remaining adhesive residue can often be rolled off with your fingers. For more persistent residue, a warm, soapy cloth or an adhesive remover (like Goo Gone or GoofOff) can be applied to a cloth and gently wiped over the area. Always test adhesive removers on an inconspicuous spot first.
For Screw-Mounted Locks:
- Simply use a screwdriver to remove the screws holding the lock components in place.
- Fill any visible screw holes with wood putty or filler, then sand and paint/stain to match the cabinet finish if desired.
By understanding the types, installation methods, and removal techniques for child safety locks, you can confidently implement effective childproofing measures to protect your little ones.